
31 October, 2013
30 October, 2013
Halloween Costume Shop - 2013
Since I was a little girl I have always loved coming up with unusual costumes to wear on that one night of the year when dressing a little crazy is not only acceptable but expected -- Halloween!
I wish I had photos to share with you. Unfortunately I, and even my children, grew up before the age of digital photography. Scanning all those years of printed photos into the computer is a daunting task that remains near the bottom of my 'to-do' list.
However I can share with you what this grandmom's 'Halloween Costume Shop' has created for 2013.
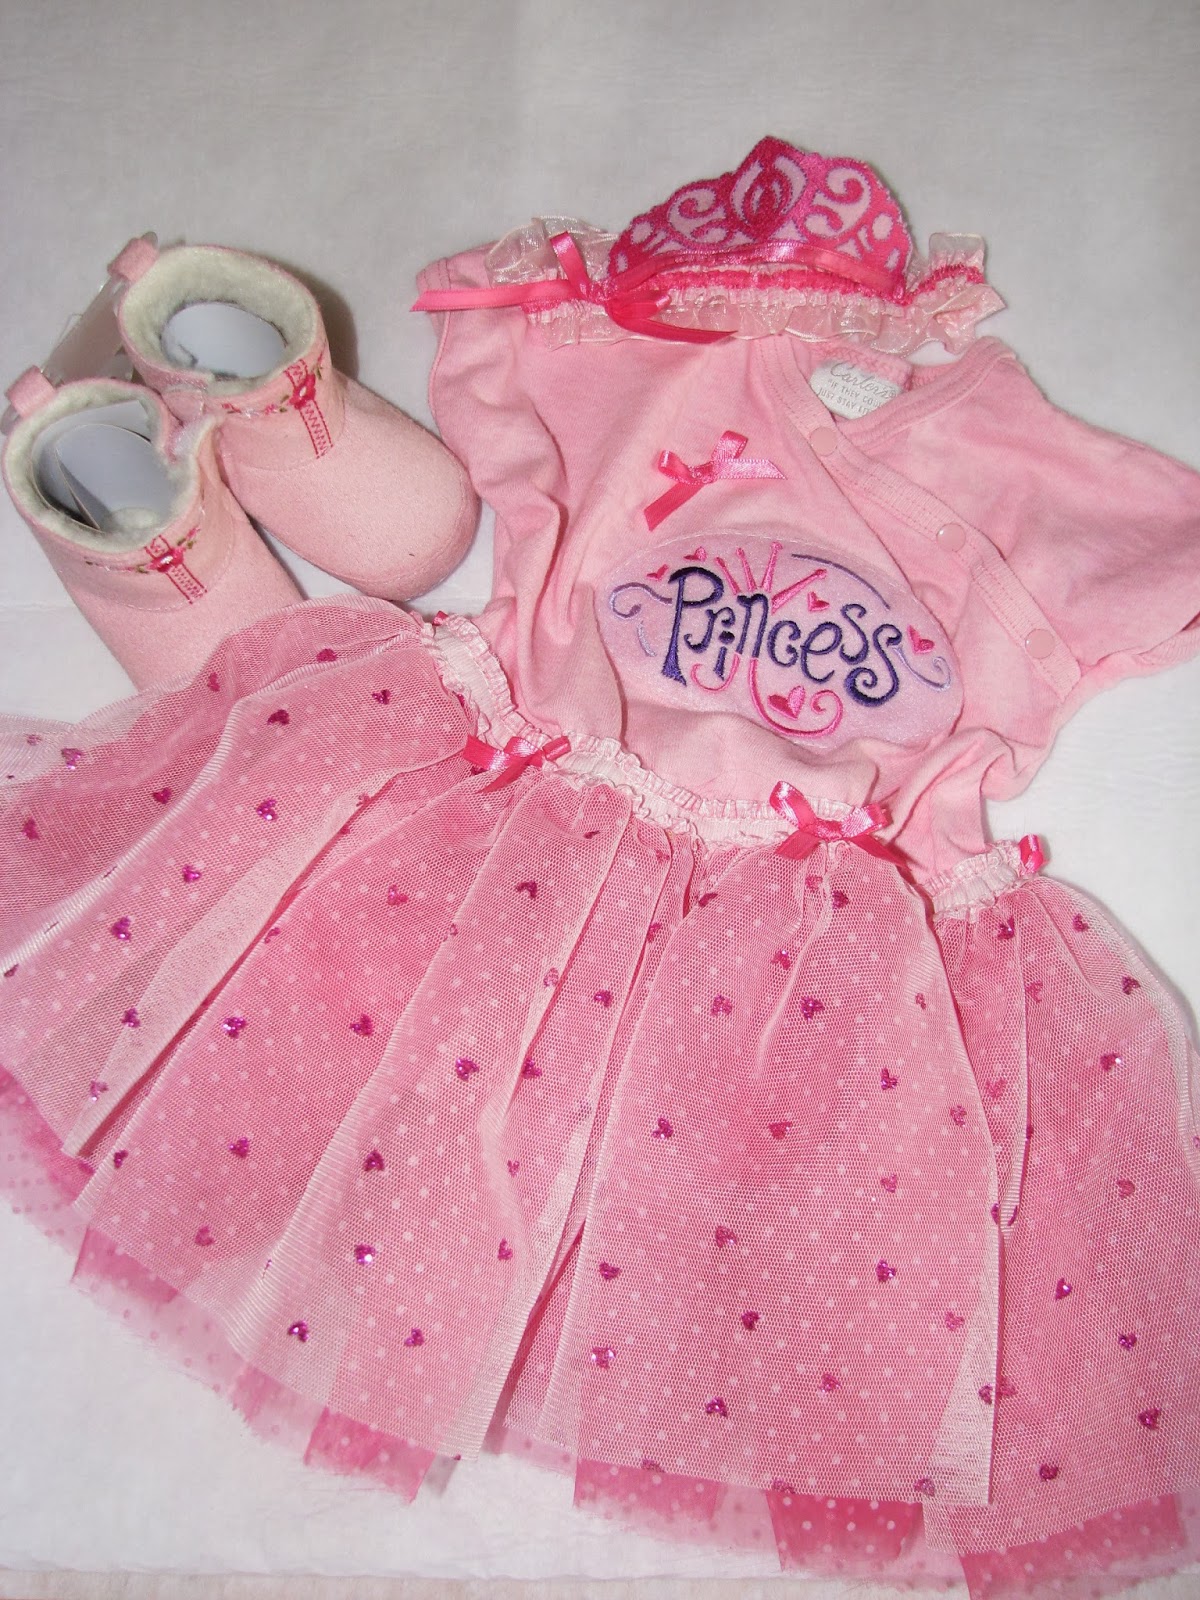
The baby princess costume started with a purchased onesie to which I attached two layers of pretty netting carefully shirred and applied in a scalloped design all the way around the waist. (An episode of Martha Pullen's program on PBS provided the inspiration for this one.) The top edge of the netting is trimmed with an elastic ruffled ribbon and embellished with pink bows. The 'Princess' embroidery design on the front of the dress (by Dakota Collectibles via EmbroideryDesigns.com) was stitched out on a piece of craft felt and appliqued onto the onesie. For my project I stitched it out in dark pink, purple and lavender threads.
Because every princess needs a tiara, even if she is only a few weeks old, I had to figure out a way for Taylor to have one of her very own. For softness and safety I created her tiara by making a pretty baby headband with ribbons used in her princess dress. I then embroidered a tiara design (by King Graphics via EmbroideryDesigns.com) onto pink felt. I sewed pink ribbon to the bottom edge of the tiara and tacked it onto the headband in such a way that it can be removed if Taylor ever wants to be a princess incognito. :-)
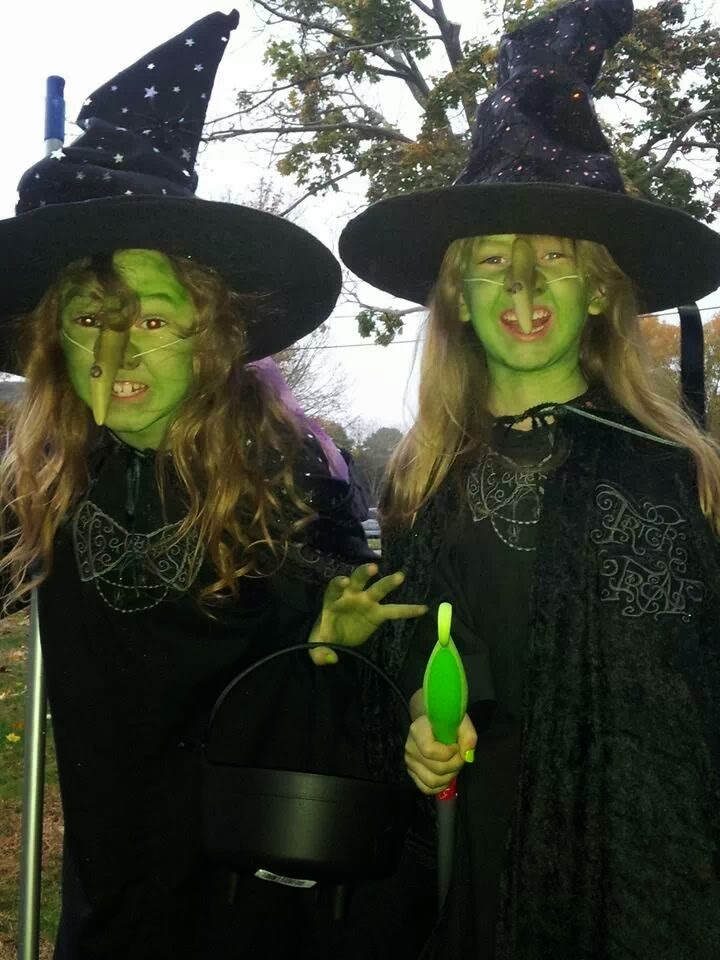
Not quite as royal were the costumes I made for Hannah and Alayna. They will be dressed this year as "wicked witches with sparkles." Little girls must have sparkles you know!
I
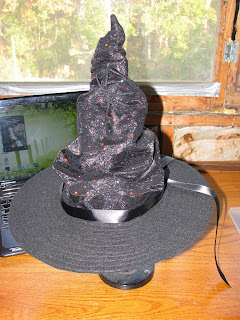
purchased nylon hats initially intending to decorate them but ended up
covering them completely with felt using the original purchased hat as a frame and lining. The top of the hat was cut into a
cone shape that is taller than the original hat. I then covered it with
decorated netting - one is sparkly stars the other is flocked spider
webs with orange sparkles.
To give the hats character I scrunched the tall felt cone down and tacked it to the shorter nylon one inside. I then covered the brims with felt on the top and the bottom and stitched around and around in a spiral until I got to the center. I embellished both hats with sparkly spiders and the ribbons.
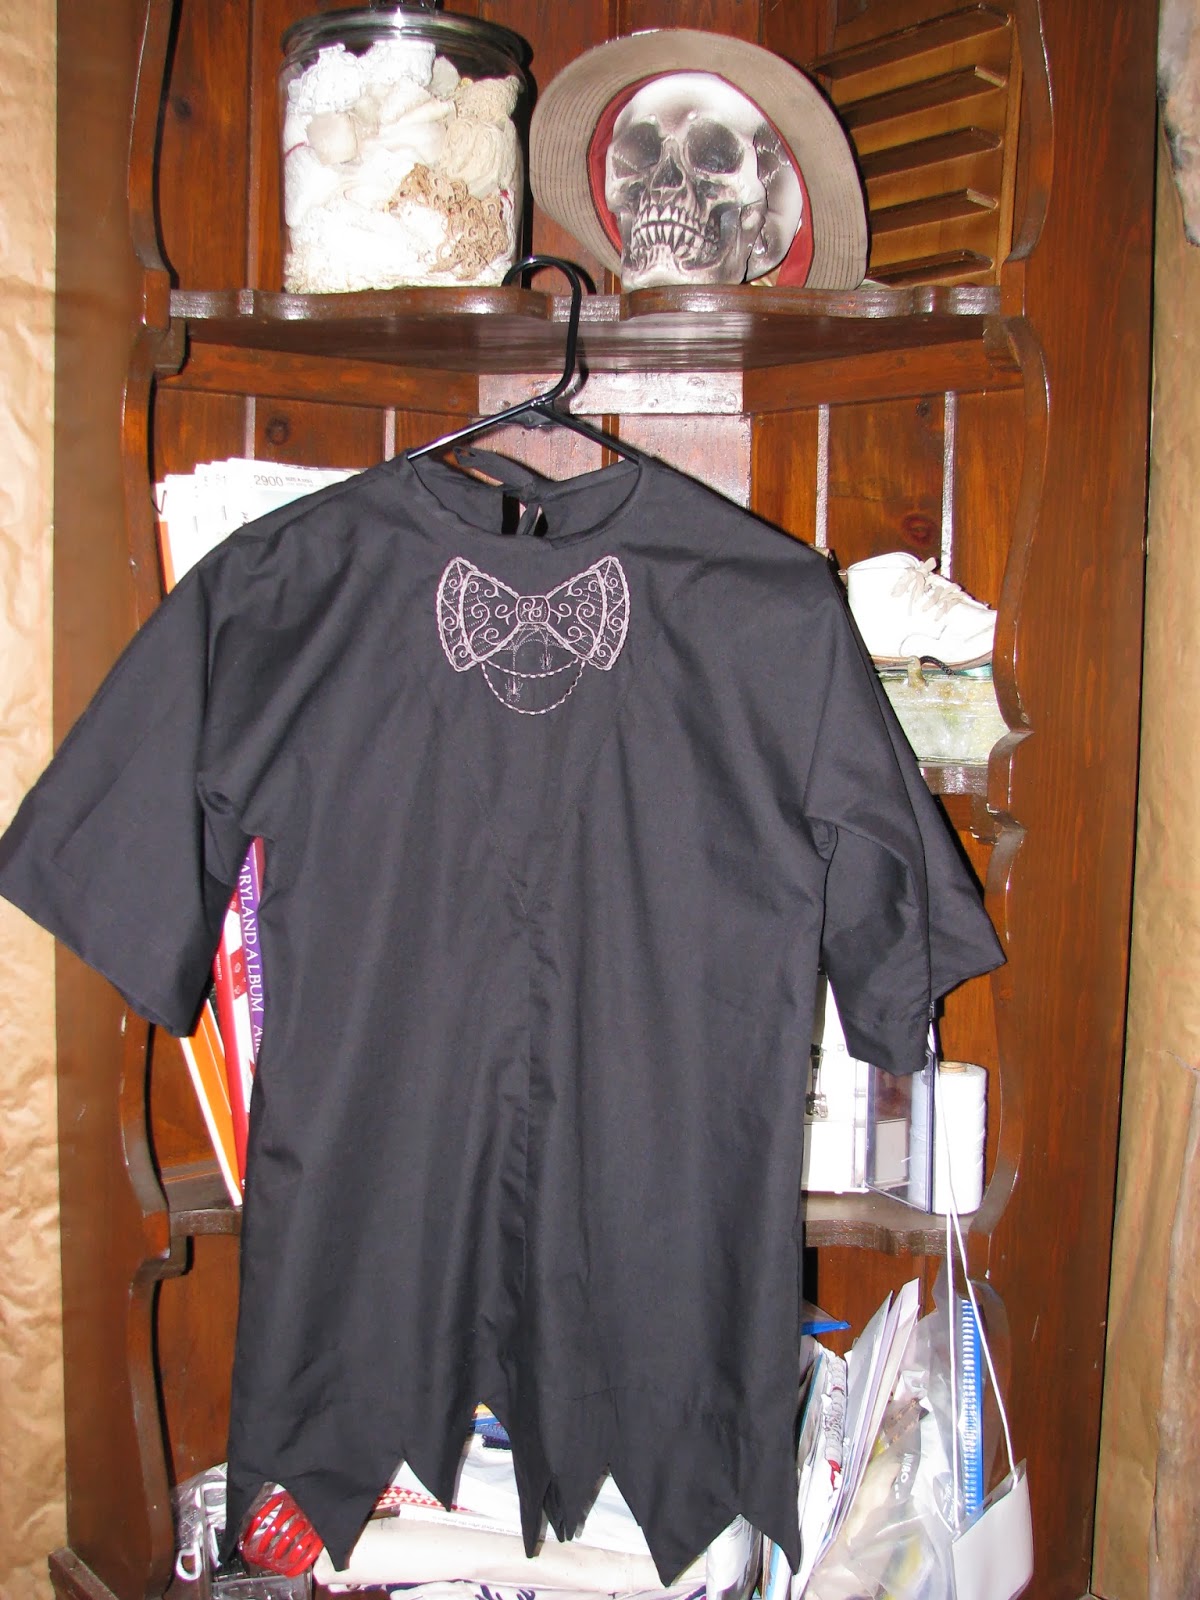
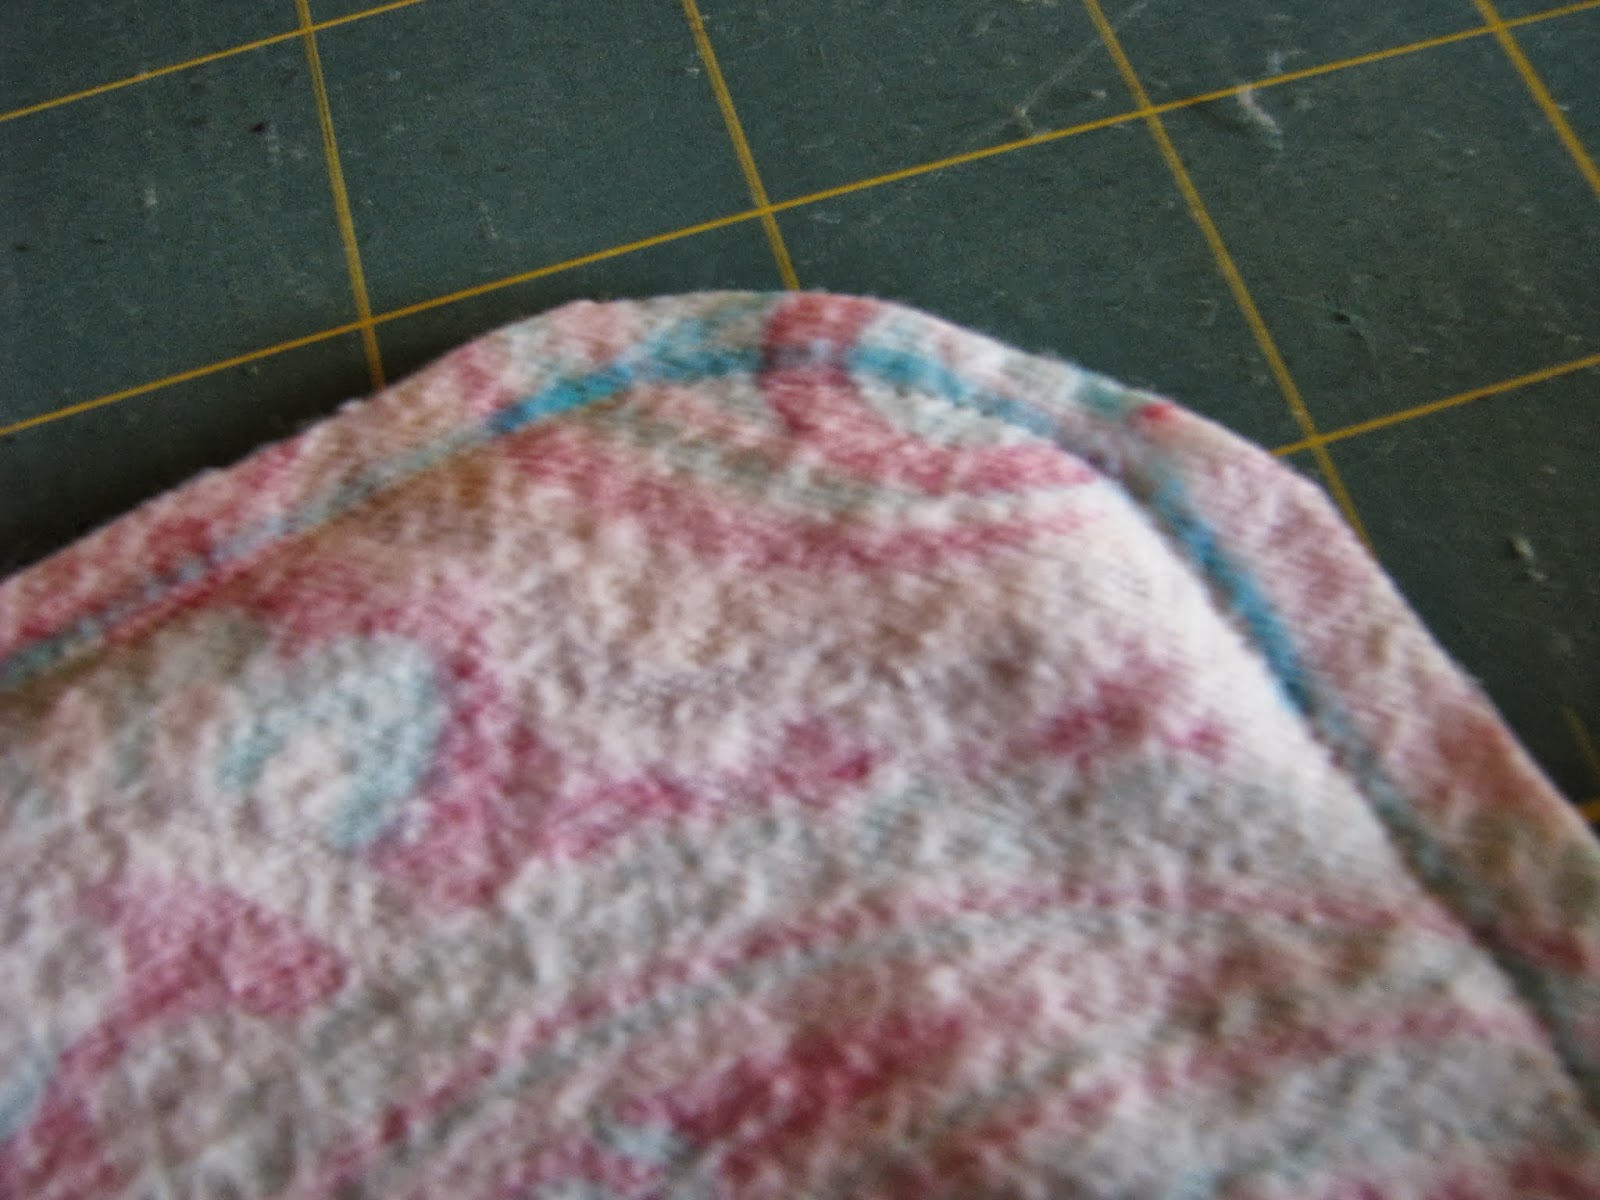
Their dresses are the same in every way except length. Both have jagged hems intended to let the girls' striped witch stockings be seen. One pair of stockings is orange and black while the other is purple and black to coordinate with the differing netting designs. Like I said - the same but different. The embroidery at the neckline of the dresses is from UrbanThreads.com. The 'Gothic Gala' bow appears to have a beaded necklace and spiders which I thought would be fun to dress up the plain black dresses. The design is stitched in a very dark charcoal thread on black cotton fabric which gives a subtle effect. It seems the flash on my camera helps it pop a bit more which is great for sharing here.
The capes' hoods are lined with the same netting that decorates the two hats. Again, the same but different.
At one point the oldest, Hannah, inquired about the capes. I explained that they are made like most witches capes of bat fur (in modern terms referred to as a synthetic faux crushed velvet). Even with the sparkles inside the hood I wanted to give the capes a little something special and once again UrbanThreads.com had just what I needed.- a wonderful gothic 'Trick or Treat' embroidery! Here again I stitched the design in the same dark charcoal grey on the black textured bat fur.
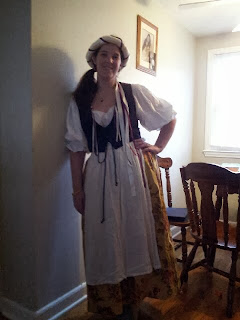
Last, but not least, is the costume made for Hannah and Alayna's mom - also know to us as our daughter Meagen. It has been a while since I have sewn anything for her, however, this year she put in a request for a Renaissance wench costume. The chemise is made of white cotton muslin with ruffles and ribbons to make it pretty. The apron is cut from a leftover piece of white cloth - left over from what I don't know. The skirt is a large floral print cotton. The maroon velveteen vest belonged to my mother. I modified it several years ago with buttonholes in place of buttons so the the front could be laced up to suit a costume I made for me. It has now been officially handed down to my daughter and I hope will continue to be enjoyed for years to come.
I am thankful that my family allows me to create costumes for them to my specifications. I am never sure they will like what I create, but they always tell me they love them. They even wear them!

My little costume shop is one of my many 'not-for-profit' ventures. It doesn't make a lot of money, though I have been told it could. In fact, it makes none! I am paid in something far more valuable than currency . . . because our girls and grands live far away my reward comes in the form of photos of everyone having a good time in costumes made with love. The best part is hearing about their Halloween adventures.
Now, that the costume shop has closed for this year I need to get started carving pumpkins...

 | |
| Actually this image is from the Graphics Fairy. |
I wish I had photos to share with you. Unfortunately I, and even my children, grew up before the age of digital photography. Scanning all those years of printed photos into the computer is a daunting task that remains near the bottom of my 'to-do' list.
However I can share with you what this grandmom's 'Halloween Costume Shop' has created for 2013.
 | |
| For Baby Taylor - the Littlest Princess! |
 |
| Princess dresses have to be pretty on the backside too! |
I liked the tiara so well I made a second one for my friend Scully to wear. . . !
 | |
| The costume shop's oldest employee. |
Not quite as royal were the costumes I made for Hannah and Alayna. They will be dressed this year as "wicked witches with sparkles." Little girls must have sparkles you know!
 | |
| Hannah (age 7) chose the hat with black polka dotted purple ribbon. The crown is covered with sparkly stars. |
Their costumes are the same but different, starting with their hats.
 |
| Alayna (age 5) chose the one with the black ribbon. The crown of this one is covered with spiderweb flocked netting and orange sparkles. |
To give the hats character I scrunched the tall felt cone down and tacked it to the shorter nylon one inside. I then covered the brims with felt on the top and the bottom and stitched around and around in a spiral until I got to the center. I embellished both hats with sparkly spiders and the ribbons.
 |
| Both dresses are basically the same - but different sizes. |
 |
| This cape has the star netting lining the hood. |
 |
| The embroidery is subtle but there just to add a little something special! |
At one point the oldest, Hannah, inquired about the capes. I explained that they are made like most witches capes of bat fur (in modern terms referred to as a synthetic faux crushed velvet). Even with the sparkles inside the hood I wanted to give the capes a little something special and once again UrbanThreads.com had just what I needed.- a wonderful gothic 'Trick or Treat' embroidery! Here again I stitched the design in the same dark charcoal grey on the black textured bat fur.
 | |
| Witch sisters! |
Last, but not least, is the costume made for Hannah and Alayna's mom - also know to us as our daughter Meagen. It has been a while since I have sewn anything for her, however, this year she put in a request for a Renaissance wench costume. The chemise is made of white cotton muslin with ruffles and ribbons to make it pretty. The apron is cut from a leftover piece of white cloth - left over from what I don't know. The skirt is a large floral print cotton. The maroon velveteen vest belonged to my mother. I modified it several years ago with buttonholes in place of buttons so the the front could be laced up to suit a costume I made for me. It has now been officially handed down to my daughter and I hope will continue to be enjoyed for years to come.
 | |
| Meagen in her costume |
I am thankful that my family allows me to create costumes for them to my specifications. I am never sure they will like what I create, but they always tell me they love them. They even wear them!

My little costume shop is one of my many 'not-for-profit' ventures. It doesn't make a lot of money, though I have been told it could. In fact, it makes none! I am paid in something far more valuable than currency . . . because our girls and grands live far away my reward comes in the form of photos of everyone having a good time in costumes made with love. The best part is hearing about their Halloween adventures.
Now, that the costume shop has closed for this year I need to get started carving pumpkins...

Best wishes to all for a very happy and safe Halloween!
24 October, 2013
Extra Soft Burp Cloths
 |
| Taylor Marie |
Today, because Taylor's mom (my oldest daughter) keeps telling me how much people love Taylor's burp cloths I thought I would share the simple instructions here. That way anyone who wants, or needs, them can have some too!
Here goes:
 I started with some really nice soft flannel fabrics in a variety of prints with bright colors that compliment the colors of Taylor's room. (There are coordinating receiving blankets too!)
Each burp cloth takes two pieces of fabric that start out approximately 12 inches by 20 inches; or 1/3 yard of a single fabric if both sides will be the same.
I purchase fabric in 1/3 or 2/3 lengths and then cut it half at the fold so that I can mix and match.
PRE-WASH!!! Most flannel fabrics shrink a lot. Often as much as 5-10% and it seems no two pieces of flannel shrink at the same rate. To be sure I create and give a quality burp cloth that won't pucker and twist later, I always pre-wash.
 Once the fabrics are washed I carefully tear one cut edge the full width of the fabric to accurately locate the grain lines.
 I then press each piece making sure the torn edge is pressed straight.
Tip: A light touch of spray starch or sizing could be helpful here but it is not a necessity.
With all of my fabric pieces prepared I start assembly by layering two fabrics with the right sides together. I line them up along the torn edge first and the selvage edge second.
Because of the nap of the fabric, flannel 'sticks' together pretty well but for a little added insurance I press them together.
Tip: If the fabrics seem overly stretchy a lightweight iron-on stabilizer could be pressed onto one of the fabrics; it should not be necessary on both sides because of how flannels stick together.
I prepare the piece for sewing by drawing sewing lines right on the fabric.
I start with the first line about 1 inch from the torn edge.
 I then measure the width I want and mark a line parallel to the first whatever width I want the finished cloth to be - usually 8-10 inches.
(This one is 9 inches.)

I then mark a line about 1 inch from the selvage
edges (perpendicular to the first two lines).
The fourth line is drawn about 18" parallel to the third line.
When I have all of my lines drawn I have a rectangle that is 9 inches by 18 inches.


Because I prefer rounded corners on these burp cloths, I use whatever 'tool' I have handy to draw a curve at each corner. A circle template comes in handy but lots of things will work. When I couldn't find my circle template I used part of a hoop from my embroidery machine. Whatever works!
A quick note: I use a blue wash-away marker to draw the sewing lines. It is possible that pressing the cloths will set the blue line but since it is on the back side of the fabric and will be buried inside the seam I don't worry about it. These are burp cloths not heirlooms! Just think what types of icky stuff they will get on them when they are in use. :-)

Next, I sew just inside the drawn line almost all the way around leaving a 2-3 inch opening at one end so the cloth can be turned to the right-side.

Helpful hint: If you find the top fabric is being pushed by your presser foot creating puckers, try reducing the pressure adjustment just a little (if your machine has that capability). An alternative would be to use a walking foot to help evenly feed the layered fabrics. Just don't stretch and pull them or you could end up with ruffled edges that will not lay flat.
Carefully trim the excess fabric about 1/4 inch around the outside of the sewn line. Trimming a little extra away around the corners will help them ease into shape.


Turn the cloth right sides out. It helps to use a turning tool. I do this step at my pressing mat so that I can set the edges with the iron as I go. The tool I use is a handy letter opener that belonged to my father. It has a nice blunt pointed edge that slips into the seams just right.

Stitch the open area closed either by hand or machine.

I then top stitch about 1/4 to 1/2 inch from the outer edge to set the shape.
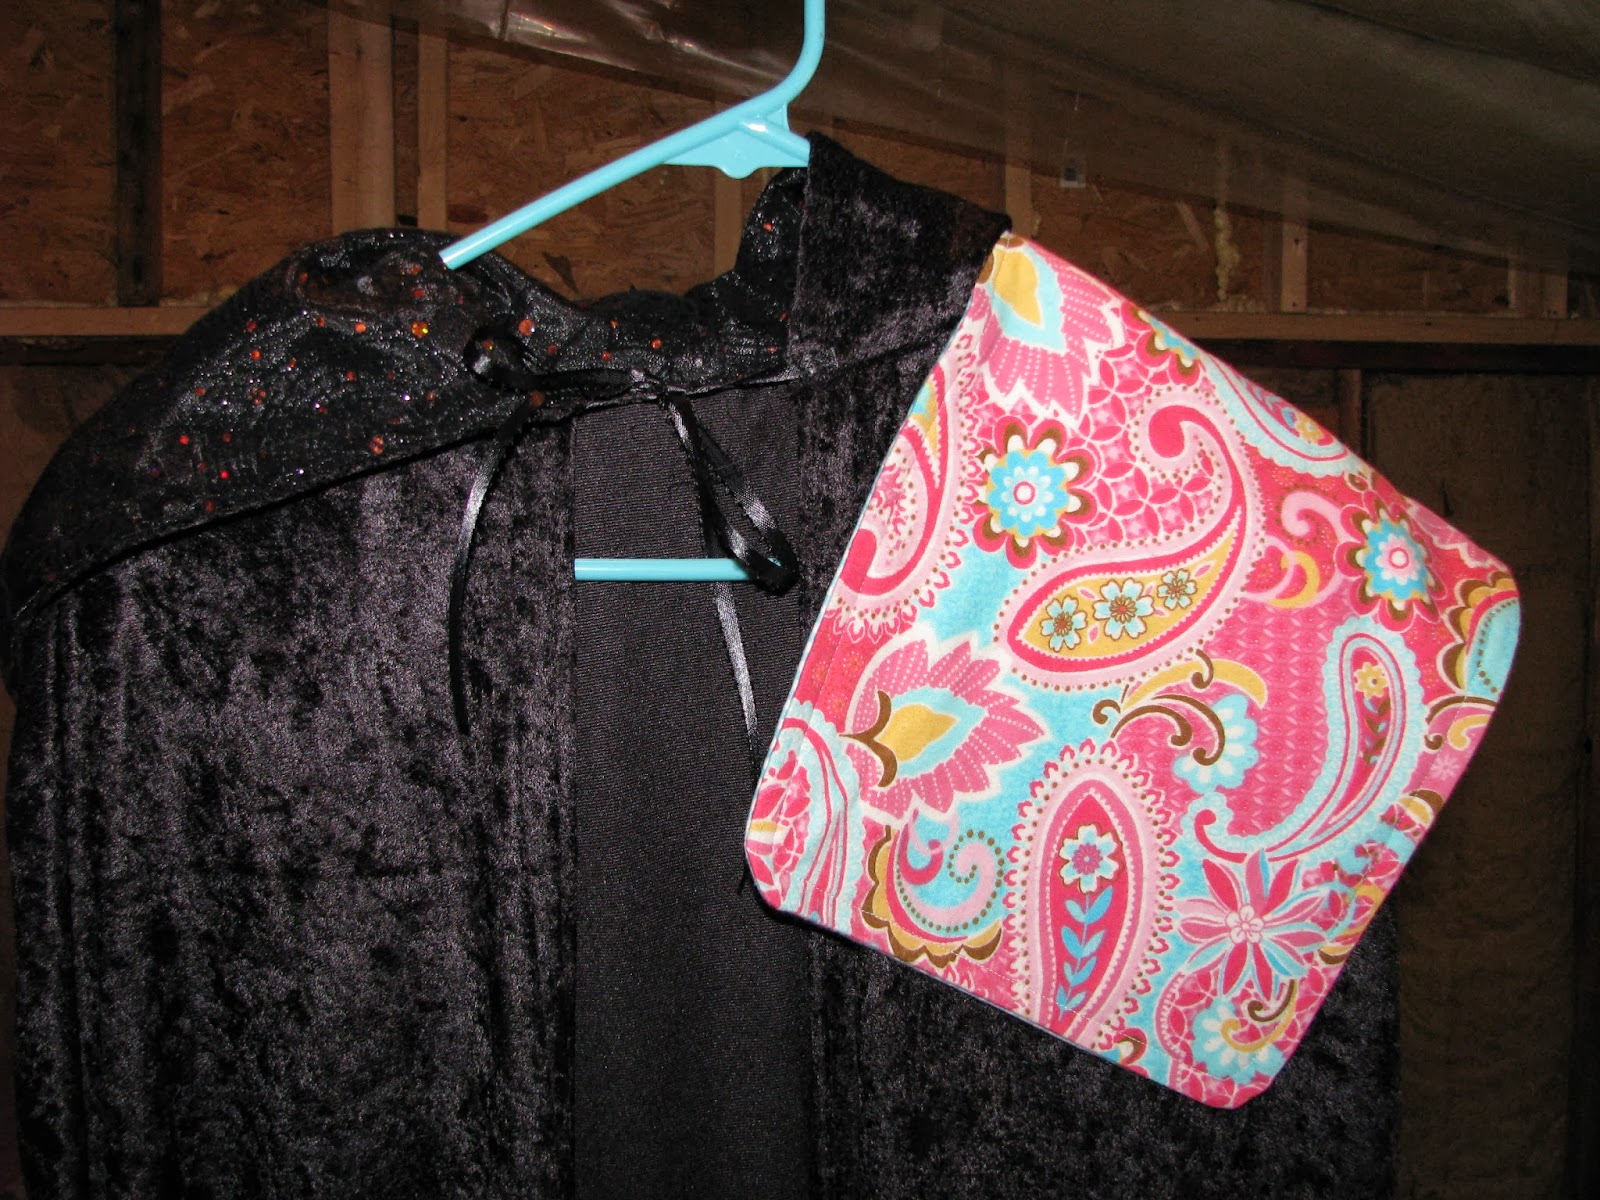 | |
| The burp cloth is draped over my granddaughter's Halloween cape. |
Voila! .
 |
| Abbie, a.k.a. my faithful companion in the studio... |
15 October, 2013
"Dutchie"
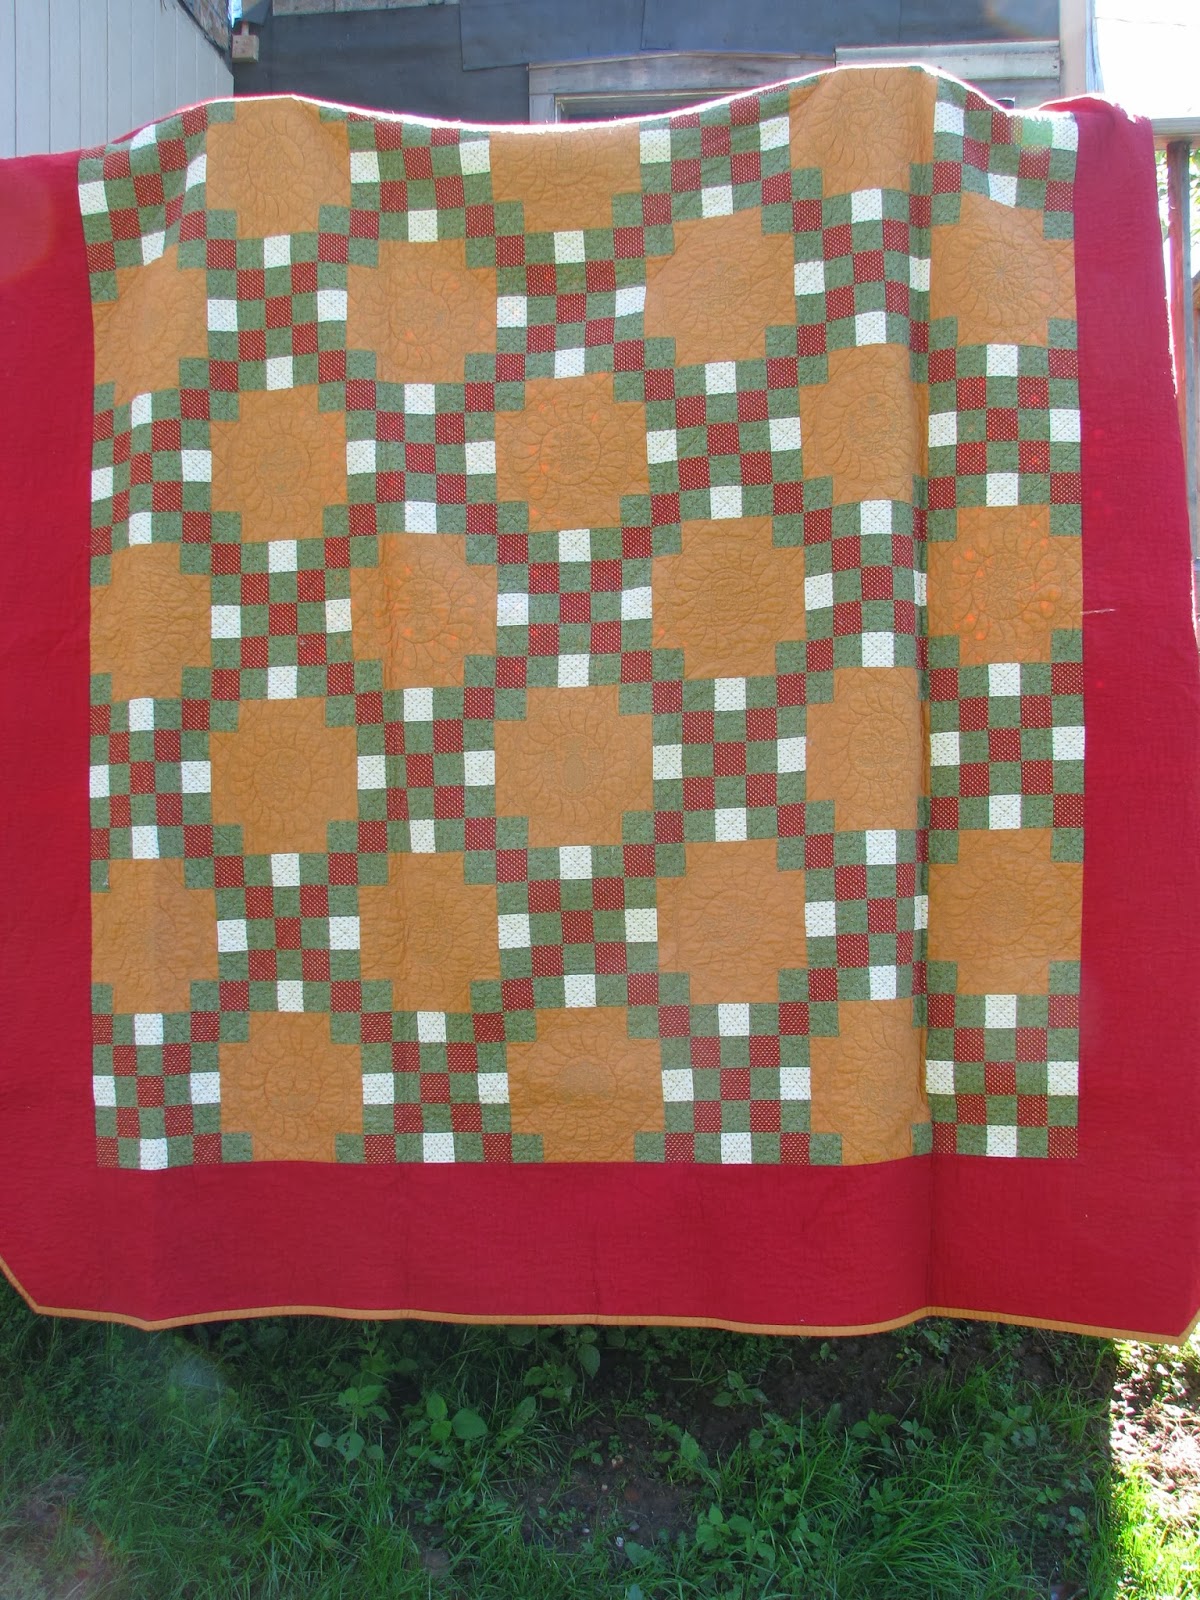
I purchased this very well-loved quilt at an estate auction in Lancaster County, Pennsylvania several years ago.

This quilt is worn.
The fabrics are thin and frayed in places.
There are a couple of holes that go all the way through.
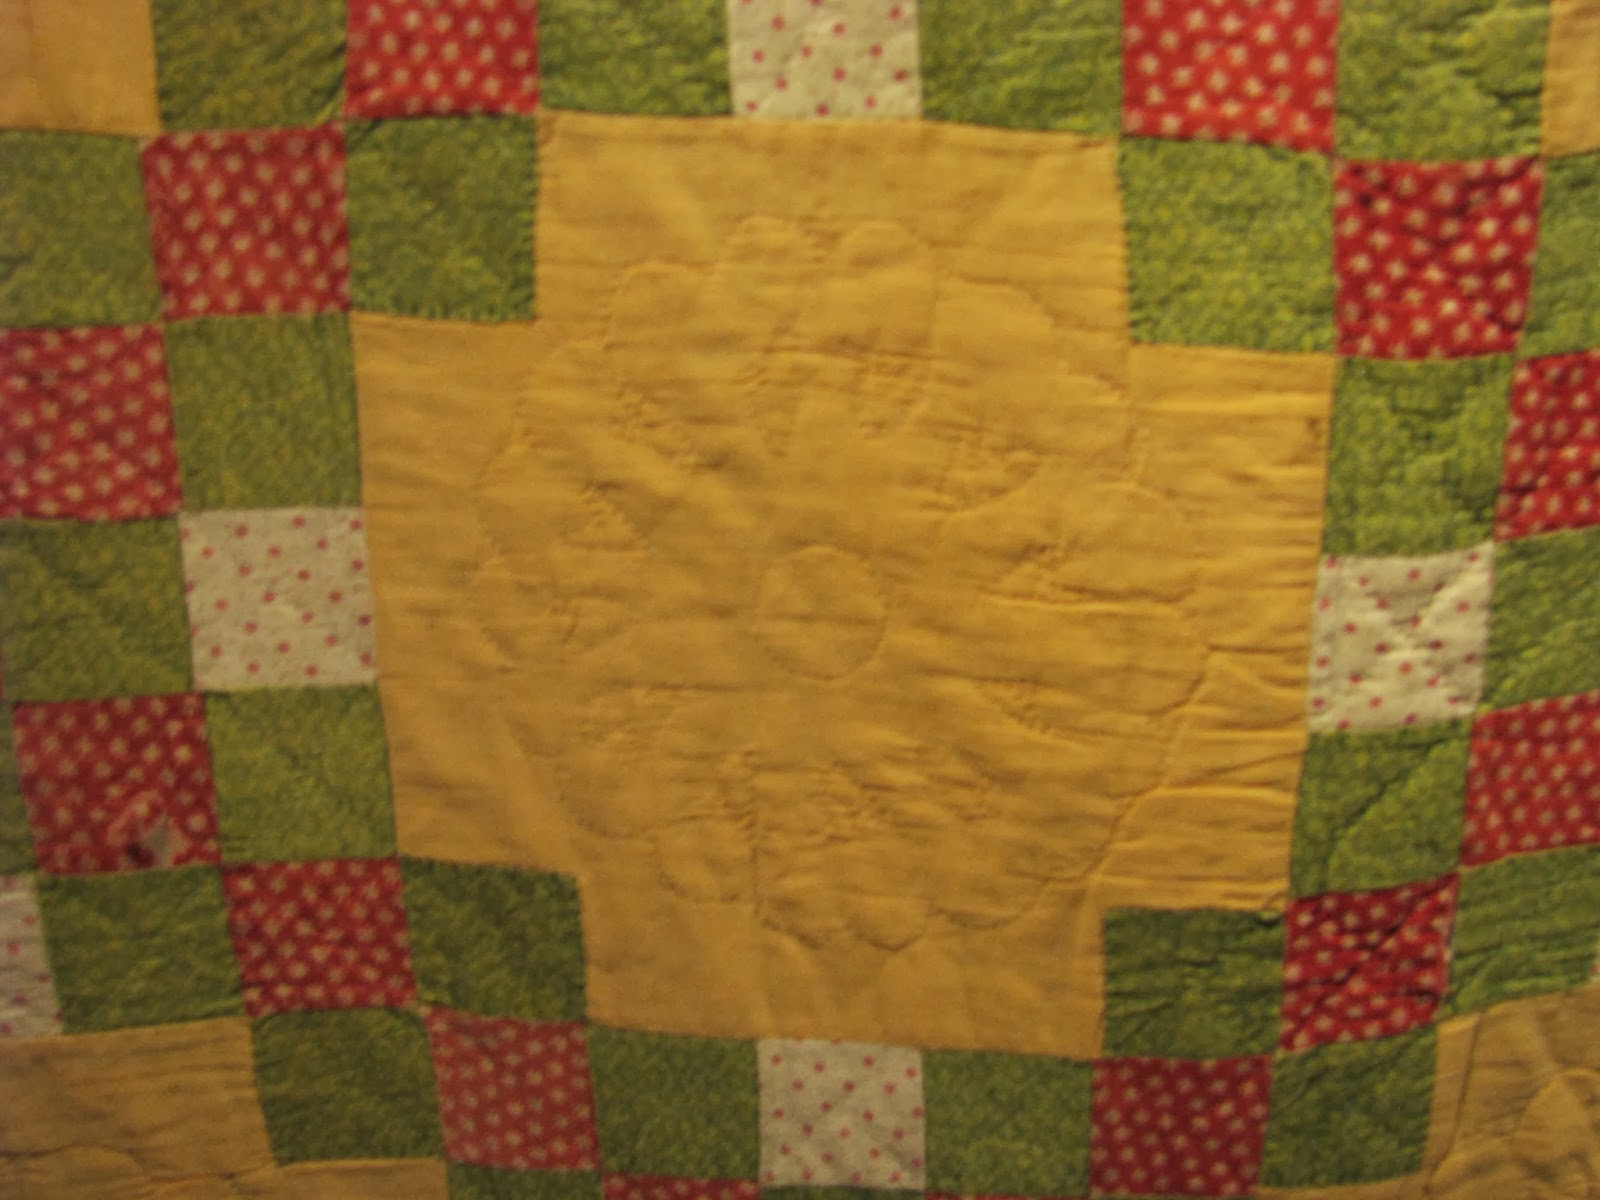
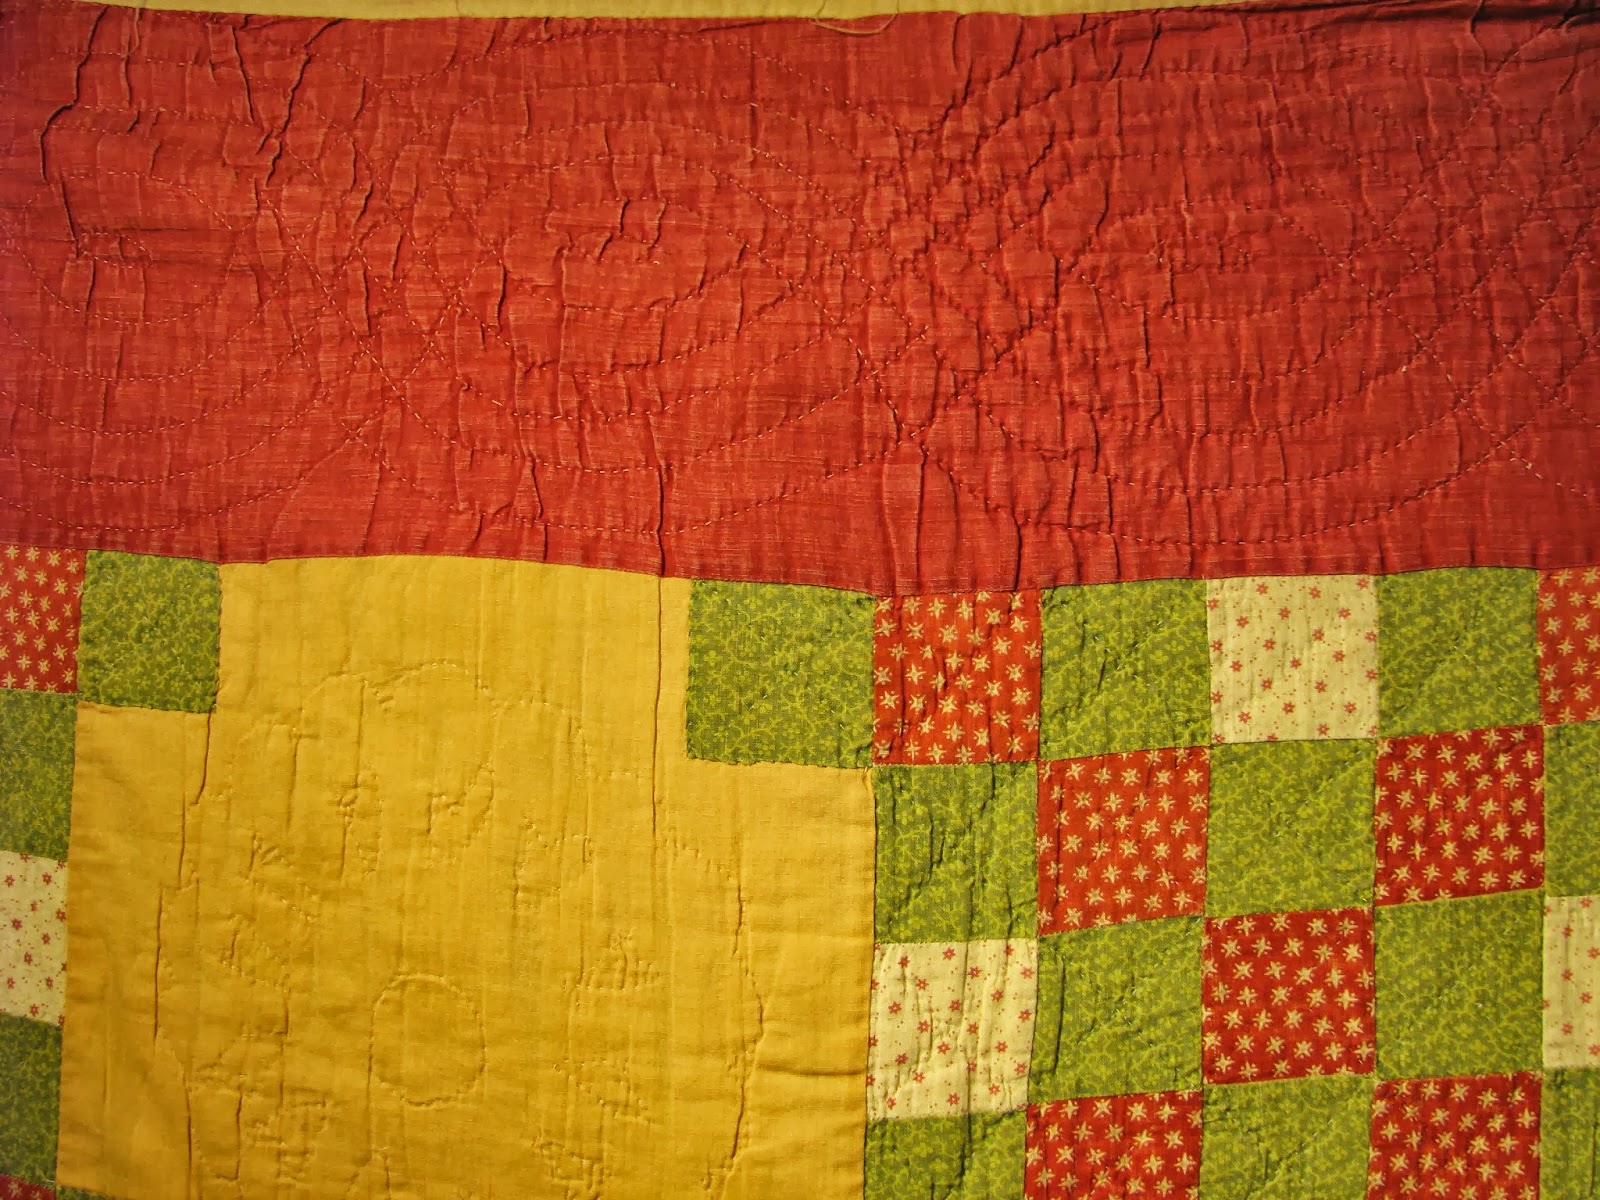
Still, the impact of the Irish Chain design in these colors is inspiring.
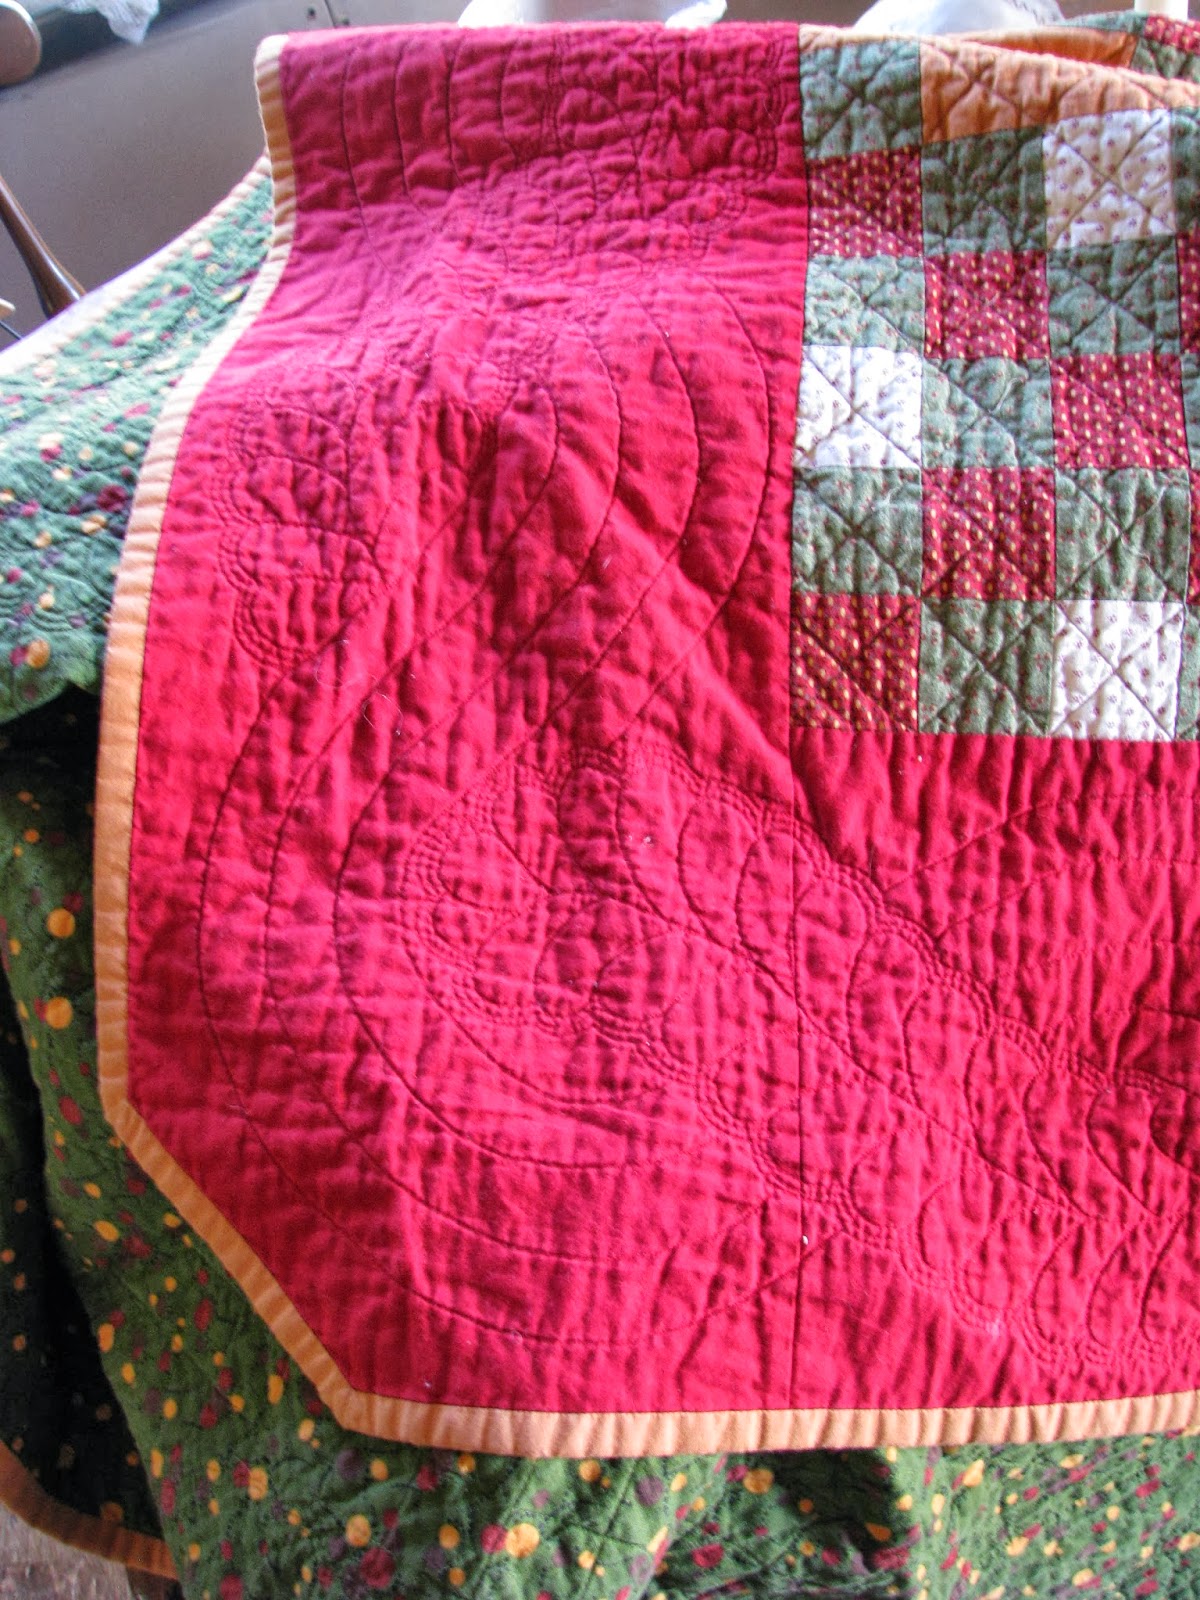
 |
| The back of the Irish Chain. |
This quilt was in a box lot filled with other textiles including two other quilts that were seriously tattered.
It was folded in such a way that only the fabric on the back showed. . .
The other quilts were early 20th century scrap quilts made of pieces of feed sacks and woven fabrics often referred to as homespun even though they were actually manufactured by machines in a mill someplace.

I unfolded this quilt expecting to see something similar to the other quilts and found this faded yet still very bright Irish Chain instead.
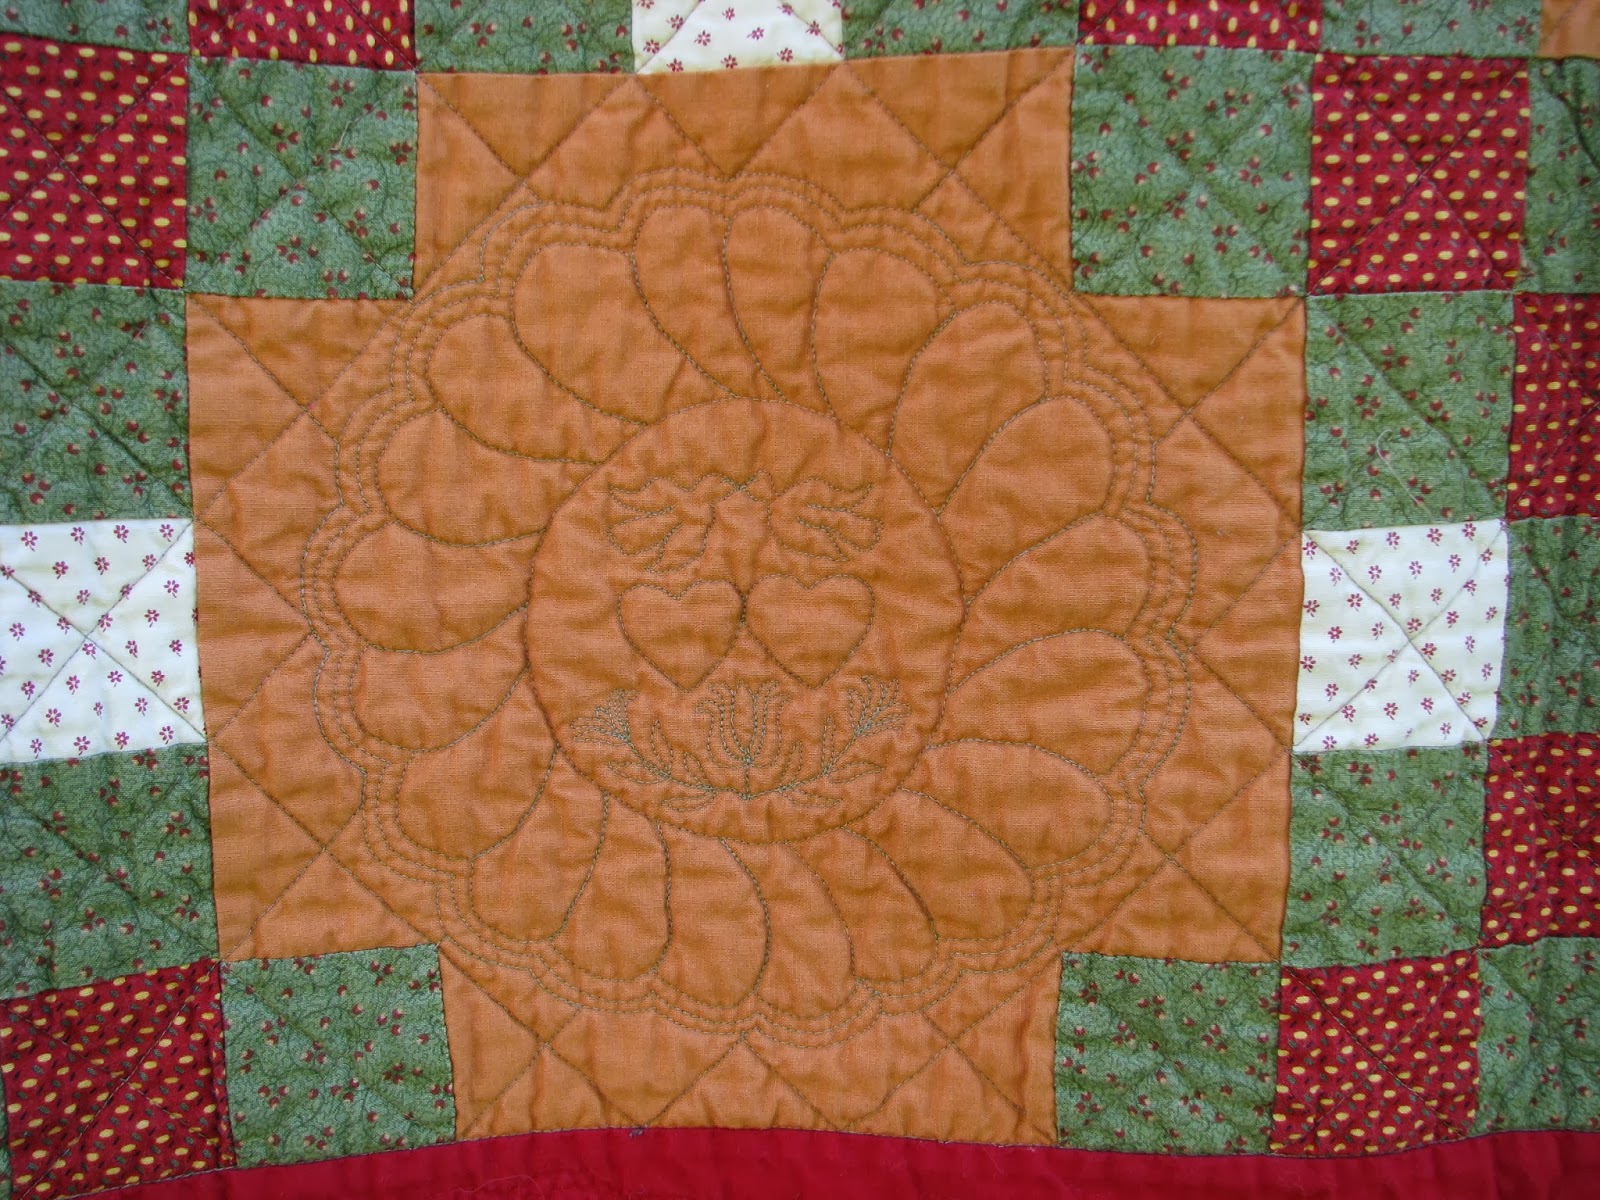
The chains are quilted with diagonal lines that cross in each small square.

Contained in each orange section between the chains are scalloped circles with heart cutouts. The design reminds me of an antique cookie press I have.
The border is quilted with rows of overlapping cables.
Unfortunately this quilt is not in good enough shape to be used for any other purpose than decorative.
Soooo . . . I made one of my own!
I chose a somewhat muted orange so that the quilt would be a better fit with other things in our home.
It's still orange!
I guess these quilts may serve as another example of orange being used as a neutral.
Instead of the scalloped circles I filled the background squares with feathered circles.
And then took that one step further . . .

by filling the feathered circles with images found in Pennsylvania Dutch folk art.
The empty feathered circles reminded me of hex signs
which often use images also found in fraktur.
 ,
, 
I quilted the border, which I often refer to as my quilting playground, with a feathered cable design.
The feathers compliment the blocks while the cables serve as a nod to the original quilt.
Peaking out from behind the border you can see the playful green with circles in just the right shades of orange and red.
I knew that fabric had to be on the back of this quilt.
I love seeing it whenever the quilt is turned down on the bed.
Or whenever I'm hiding underneath my quilt to stay warm!
While my quilt is not a replica of the antique one,
it is more directly inspired by this antique quilt than most quilts I make.
Usually my inspiration comes from several antique quilts that I blend into a design of my own.
This time I decided to challenge myself
to use some of the bright colors often found in Pennsylvania quilts.
It looks great on the bed this time of year -
really brightens the room on those blustery autumn days!
Gelukkig quilten!
08 October, 2013
The 'Lydia E. Boyer 1876.' Quilt
 |
| A few months ago I promised to share more about this quilt . . . |
I purchased this quilt from an antique shop in Lancaster County, Pennsylvania. Very little is known about it other than the dealer acquired it locally. The condition indicates it has been used and loved. The madder print in the blocks has pin-dot holes in the centers of the white areas where a harsh dye used to print the design has deteriorated the fabric throughout the quilt.
 | ||
| There are 3 of this block variation. |
The designs are a bit quirky yet the workmanship overall indicates this quilt was made by a quilt maker(s) with at least some experience. The stitching throughout is relatively consistent, however, the applique in some blocks is done with a small running stitch on the top edge of the folded design piece; in others it is a more traditional hand applique stitch. The binding was created by folding the white fabric used for the back over to the front; it appears to be original to the quilt. The batting is a very thin cotton. The quilting stitches are 9-10 stitches per inch.
 |
| There are 2 of this block variation. |
This quilt first caught my attention because of the folksy appearance. The way it was folded only four of the Oak Leaf and Reel variation blocks were visible yet each one was obviously a little different. Imagine my surprise when I unfolded it to discover such a variety of blocks. ----- Why? Don't know.
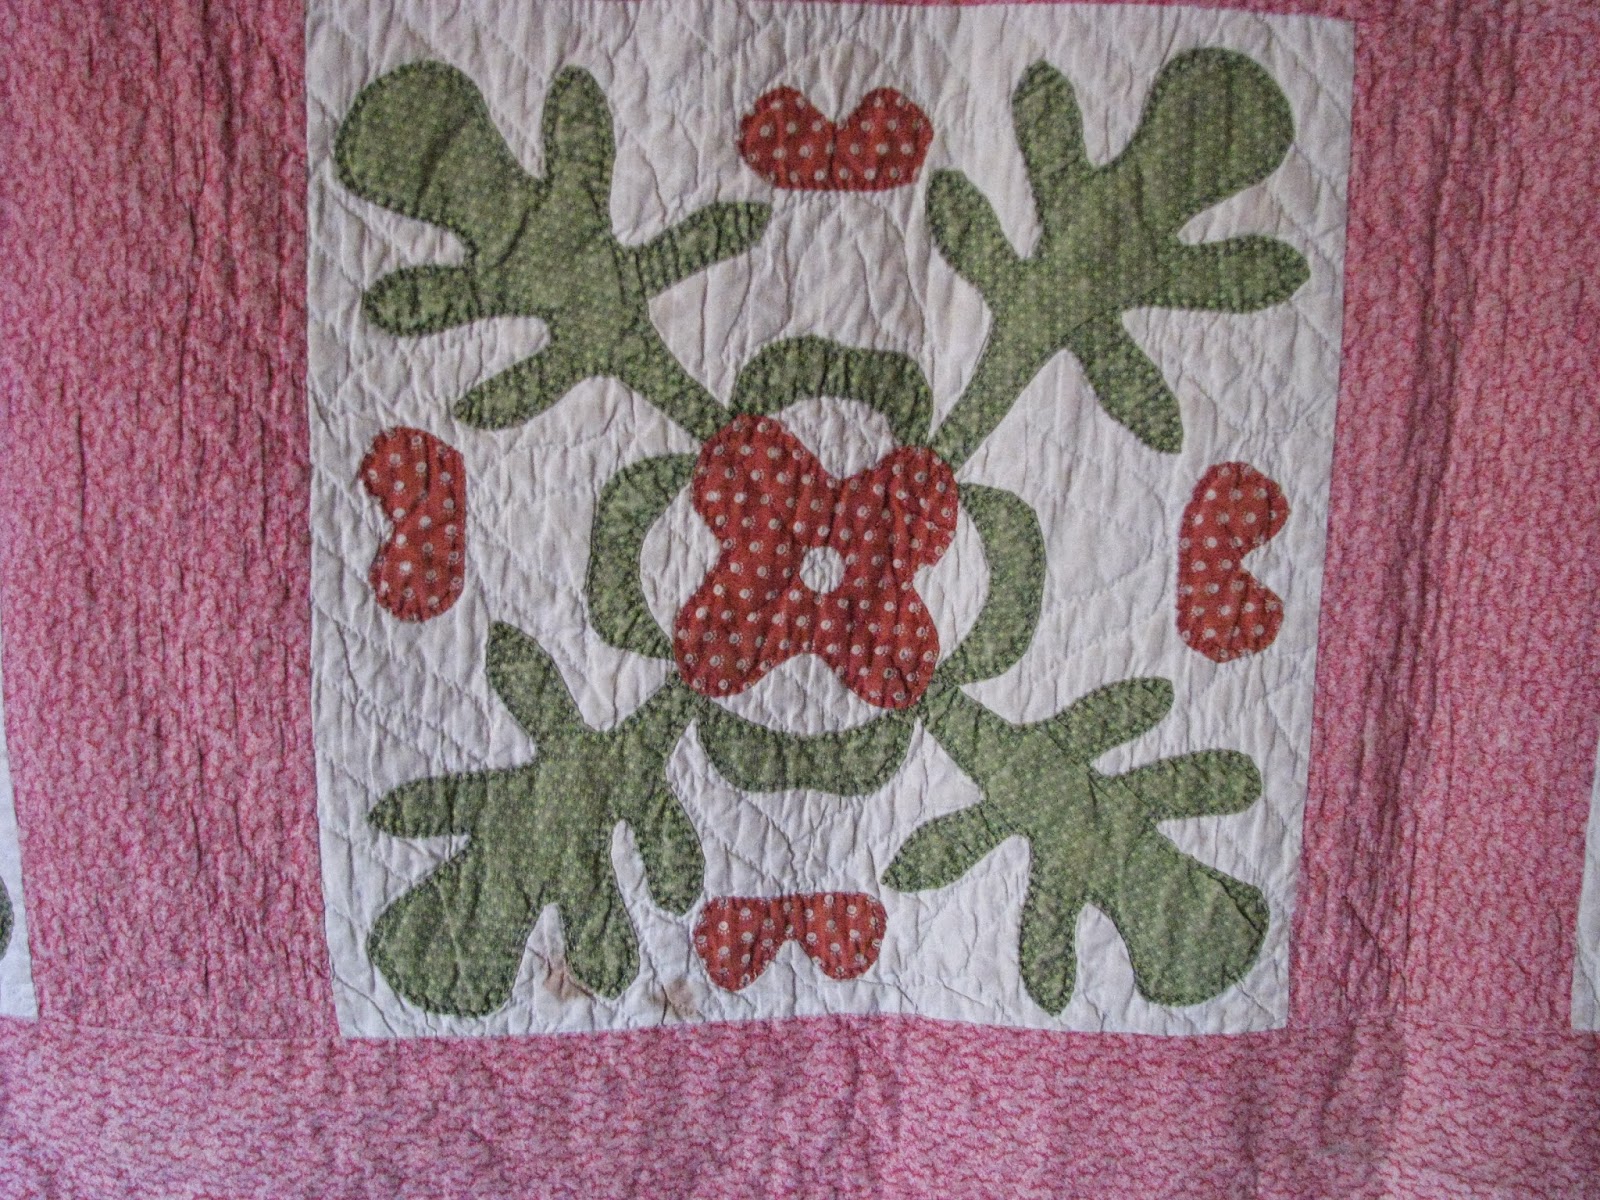 |
| Is this block supposed to be like... |
 |
| the 4 of this block variation? |
Taking into account the
condition I almost did not purchase the quilt, until I spotted something
interesting as I started to put it away. What, you ask?
A signature and a date!!! The price was reasonable enough for that simple detail to change my mind.
A signature and a date!!! The price was reasonable enough for that simple detail to change my mind.
 |
| There are 2 of this block variation. |
The quilt came home with me and ended up tucked away for a while. A few months ago I pulled it out of storage to consider using as inspiration for a Oak Leaf and Reel quilt I had in mind to make. I had completely forgotten about the signature and date, soooooo..., I had the great pleasure of discovering them again. Unfortunately, the date meant the quilt would not work as inspiration for my project. Oh well . . . I decided to do a little research to see if I could find out anything more about the quilt and/or Lydia E. Boyer in 1876?
 | |
| There is only 1 of this block variation. |
To date I have searched Ancestry.com for the name as it appears on the quilt. As anticipated, Lydia's name is not unique - yet is not a common one either. So for now, because I know the quilt came from an estate auction in Pennsylvania, I have limited my search to the U.S. Census Records looking for Lydia E. Boyers who would have been living anywhere in Pennsylvania during 1876. Today I found two.
 |
| There is only 1 of this block variation. |
The first Lydia E. Boyer I found was in the 1880 census. At age 4 she was living in West Brandywine Township, Pennsylvania with her parents Isiah (age 31) and Mary (age 27). Lydia E. is listed as the fourth of six children, all age 8 or younger. It is interesting that Lydia E. is the only child listed with a middle initial. The census page indicates that her parents were born in Maryland and all of their children were born in Pennsylvania. I also noted that the Boyer family is one of very few families recorded on 24 census pages for the township whose "color" is listed as black. Isiah's occupation is listed as 'laborer' as are many of the other male head-of-household residents. Most of the township residents are farmers; there are also a few seamstresses, and even fewer blacksmiths, masons and millers. Mary's occupation is noted, as are many of the other mothers with children at home, as 'keeping house' rather than housekeeper. Regional phrasing, like accents, are interesting . . . aren't they?
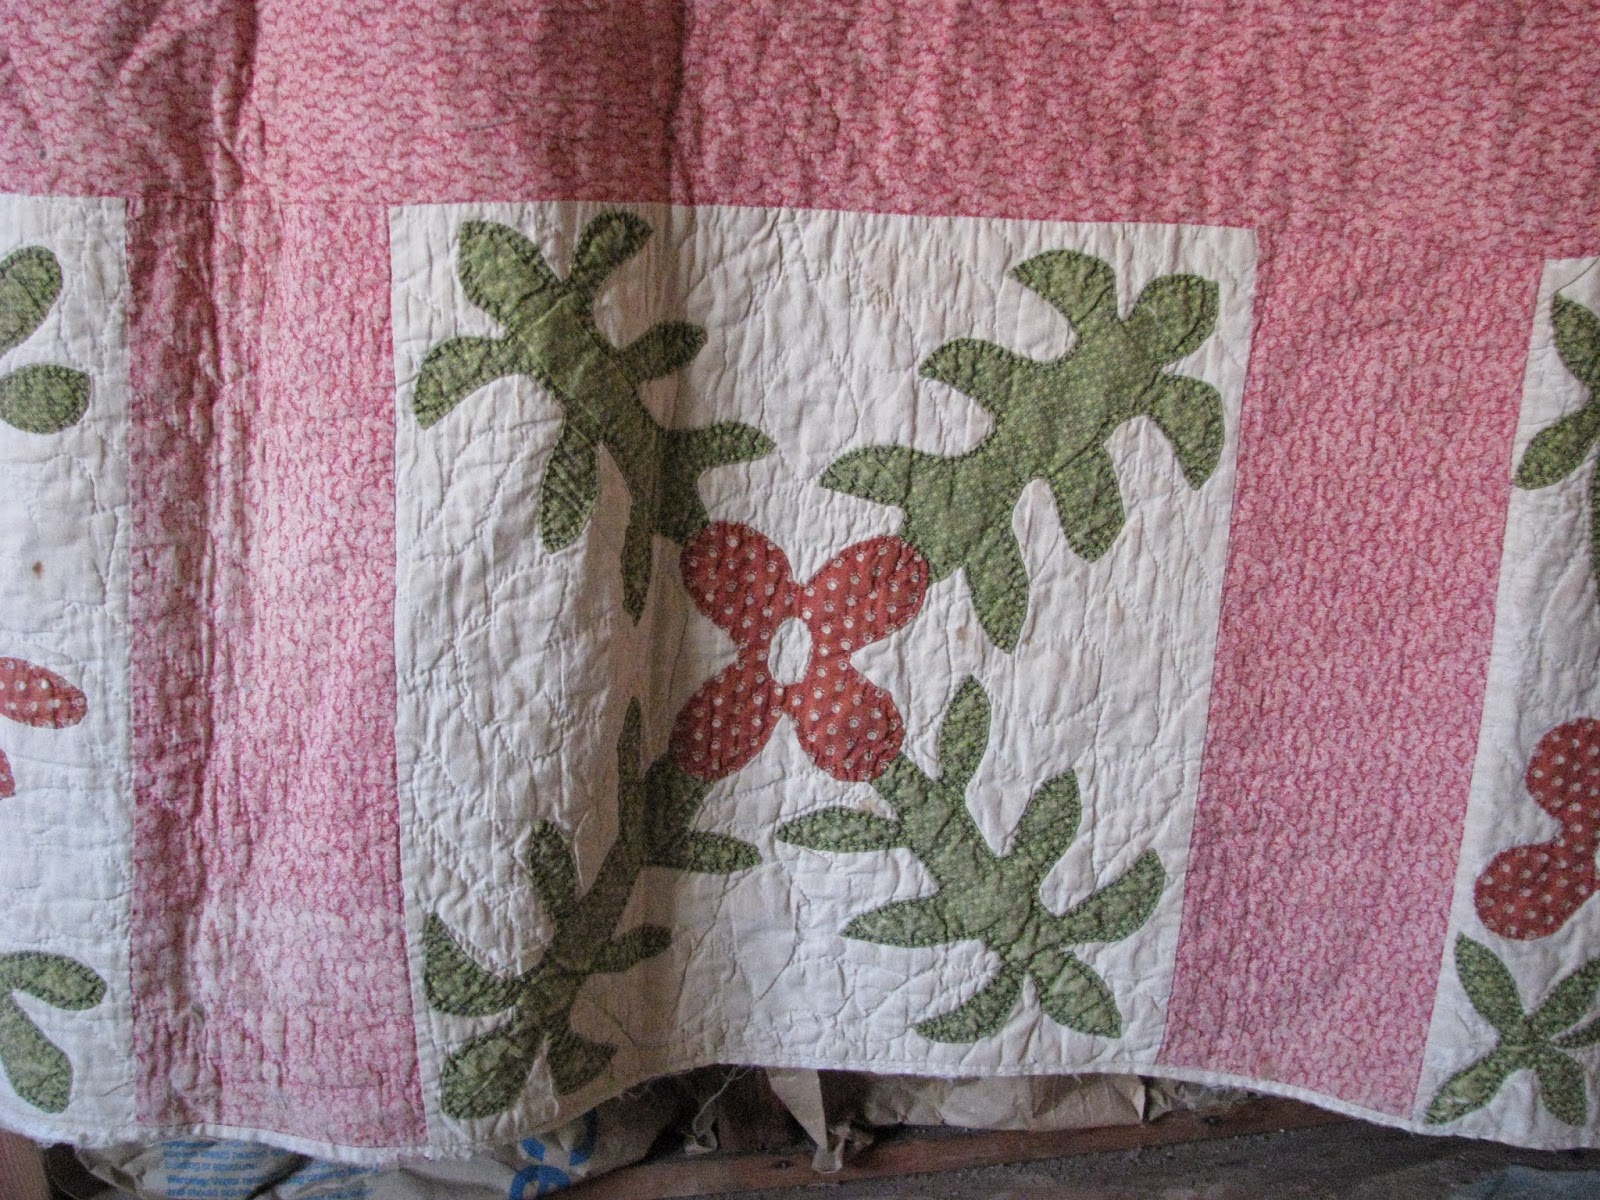 |
| There is only 1 of this block variation. |
The only other Lydia E. Boyer I discovered in Pennsylvania today appears in the 1900 census for North Lebanon, Pennsylvania. She is listed as having been born in January 1825 which means she would have been 51 in 1876. She is living in the household of Harry Cox (age 31) who is employed as an insurance agent, his wife Kate (age 27) and their two small children. Lydia is listed as a white, widowed 'grandmother who cannot read or write. There is also a notation that she had 1 child and that 0 are living.
 | |
| There is only 1 of this block variation. |
Today, I have done what I can with only a limited amount of time to search. The fact that the quilt was discovered in Pennsylvania does not mean the Lydia referenced on the quilt ever stepped foot in Pennsylvania. This was simply a starting point and there are still plenty of Lydia E. Boyers left to be explored another day. I will let you know if I am ever able to find the correct Lydia.
 |
| "Lydia E. Boyer 1876." |
I can't help wondering if this is Lydia's signature, or simply her name beautifully scribed on the back of the quilt with a date that meant something to Lydia or to the person who wrote it. It is located near the center of one side of the quilt. There are no other signatures or names that appear anywhere in ink or thread that I have been able to find.
I wonder too if Lydia E. Boyer may have been the person who did the quilting. That could explain why her name is so nicely placed between two parallel lines of quilting. It could also explain why her name is the only one on the quilt. If that is the case then I think we can rule out the possibility of Isiah and Mary's daughter being the Lydia this person this name refers to.
Don't forget to sign your quilts
and other wonderful handmade items!
Subscribe to:
Posts (Atom)