28 December, 2012

Meeting deadlines . . .

Is is not strange how meeting deadlines can take over our lives?  Lately I have been rushing to meet one deadline after another, after another...  The last one for a while, I hope, was Christmas.  This year the holiday rush was actually a slower pace than we had been moving for a while.  I have to admit though, from where I sit now all of the activity has been well worth the time and energy spent meeting all those deadlines.

I embroidered towels to wrap the holiday breads we delivered to our friends and neighbors on Christmas Eve.     


It is not that the work is done now - in fact quite the opposite.  There is much to be done and probably always will be.  However, for now there are no 'pressing' deadlines to be met like those we have been dealing with.  We will be able to work at our own pace.

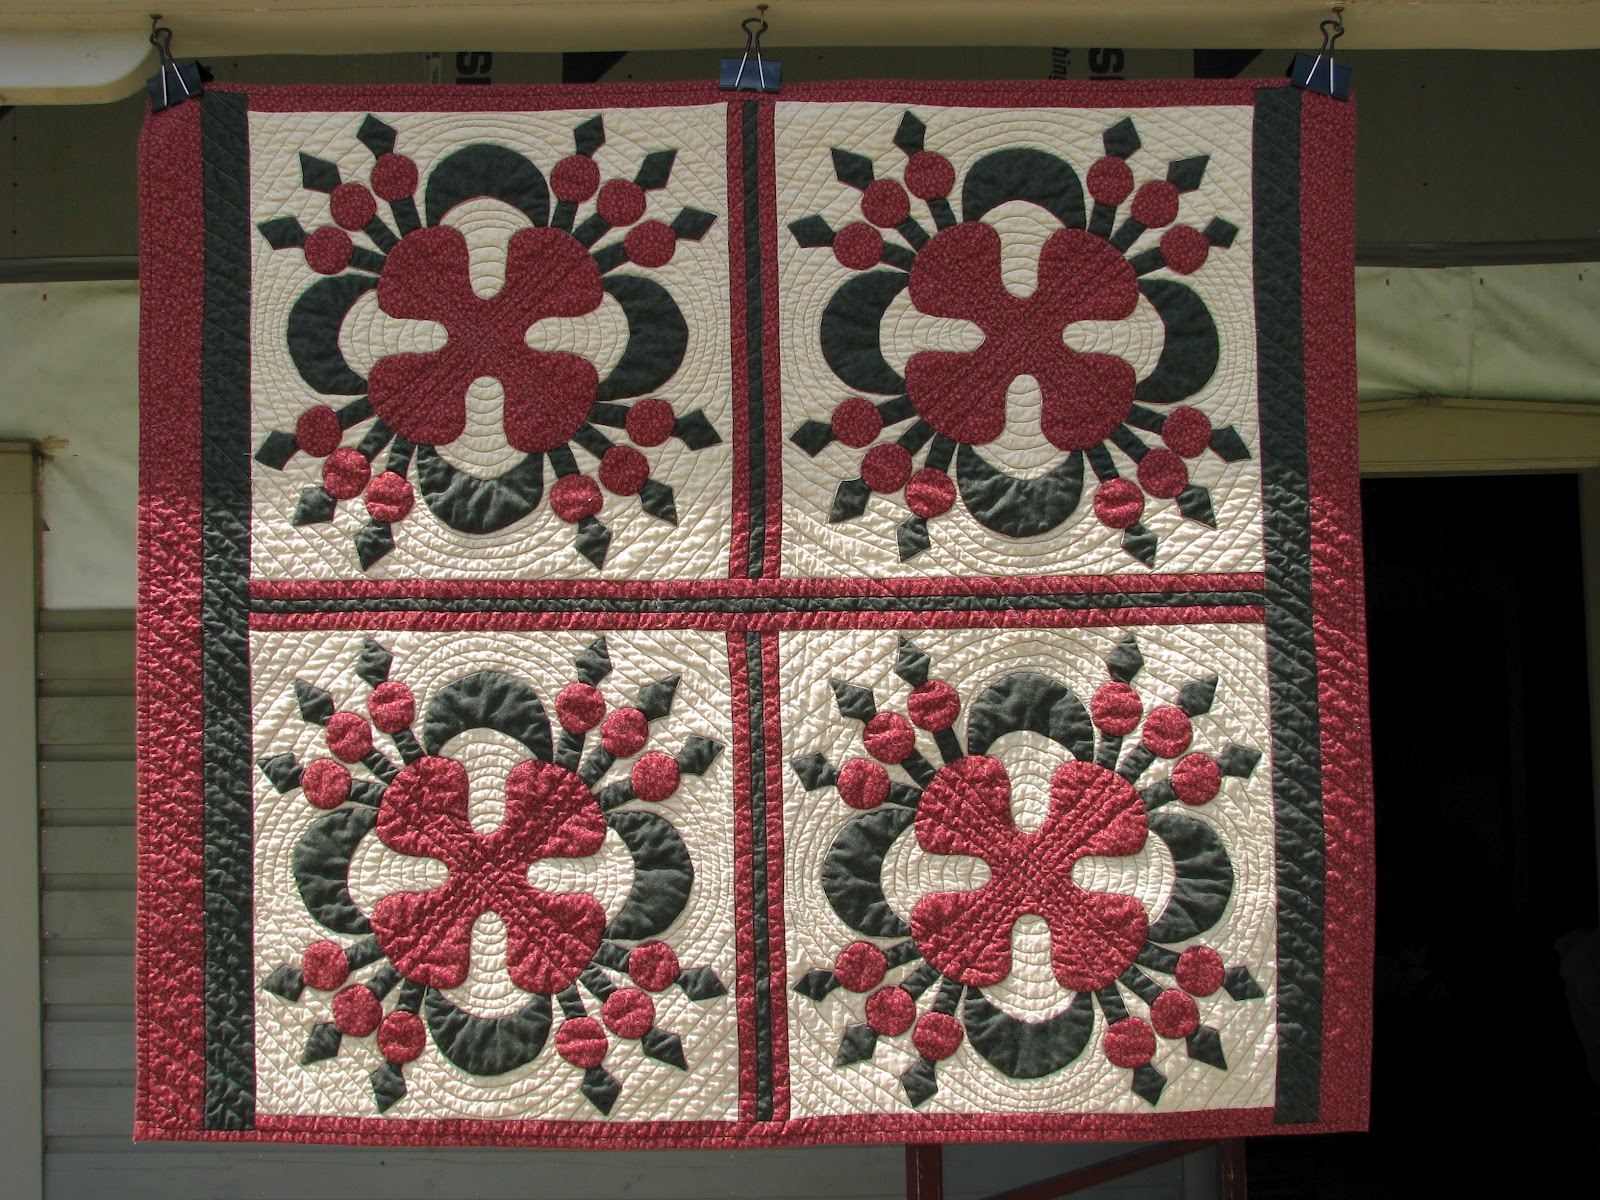
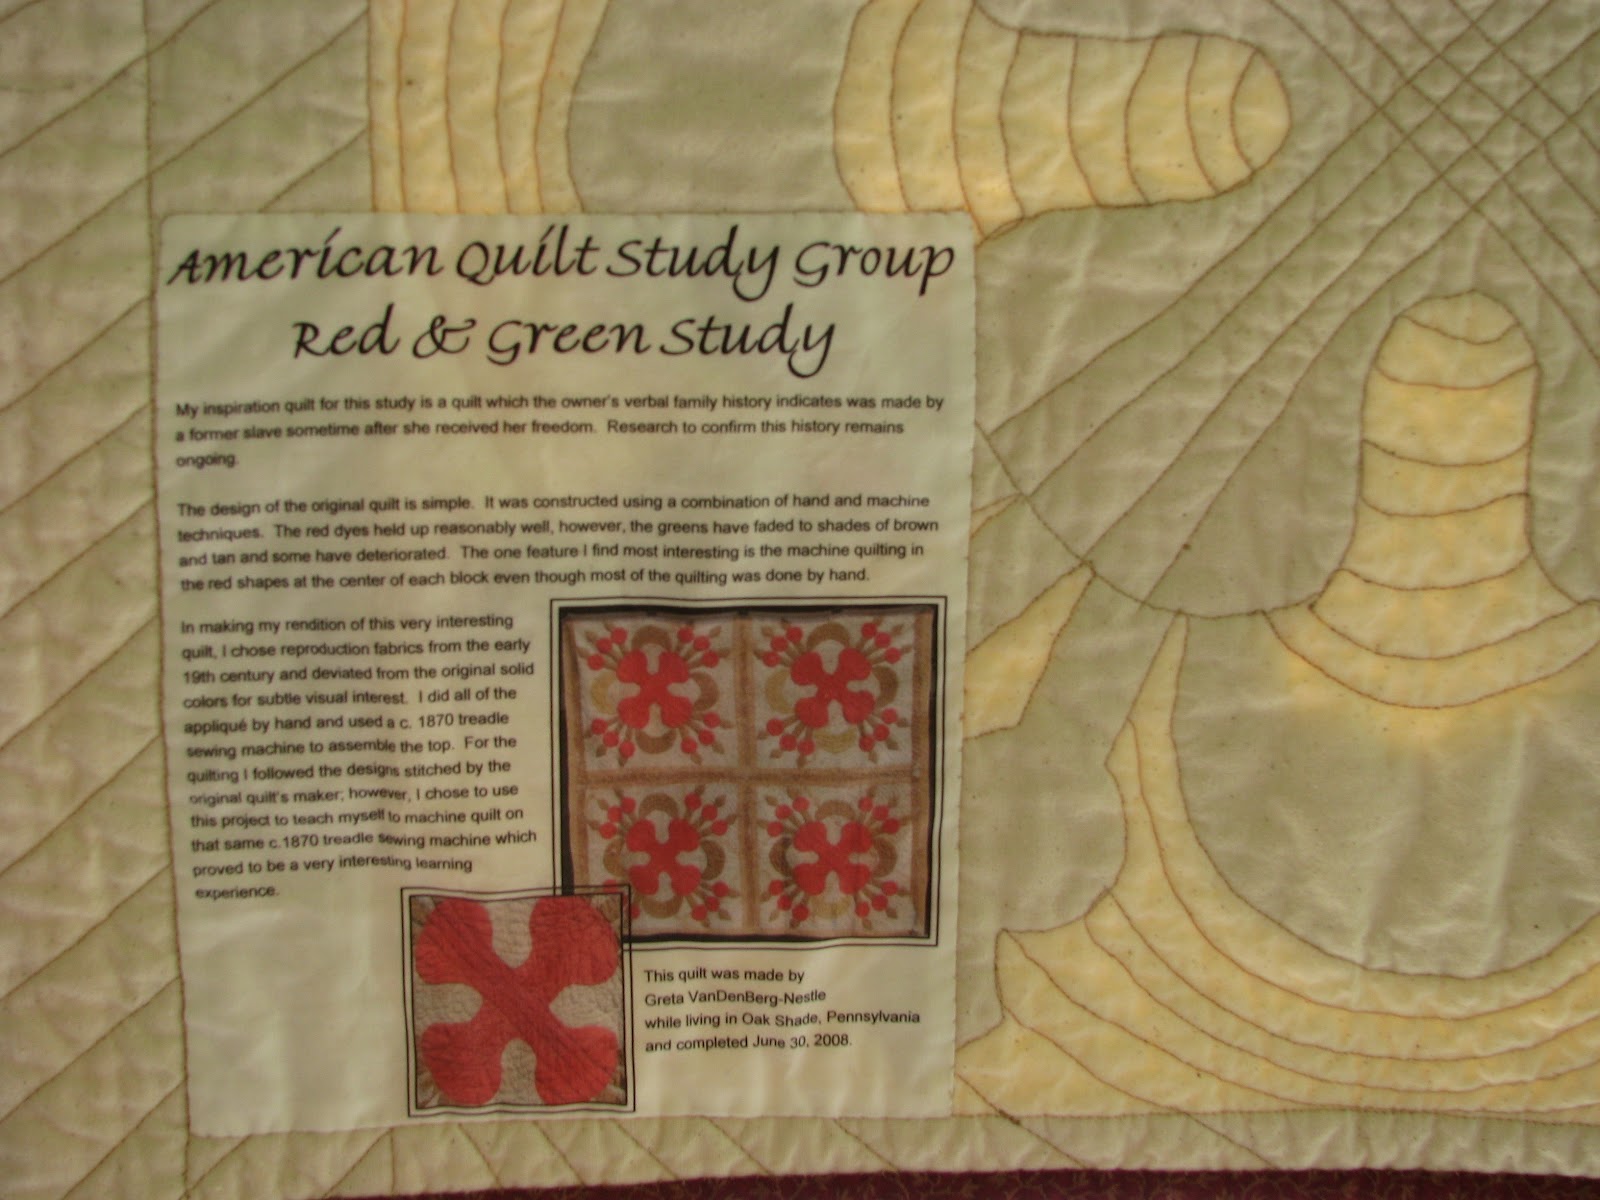
I posted a few weeks ago about one of the major projects I was working on - the AQSG Quilt Study biennial exhibit.  Of course, that project is ongoing and I have lots of help from other members of the QS Committee.  In fact, at present there are 3 studies currently active - two of them are travelling exhibits the other is the 2014 Study of Civil War Quilts: 1850-1865 which you can learn more about by clicking the link; so there is no need to go into detail here. 

One major deadline came on December 3rd and 4th when we got a new roof on our house.  Or most of one anyway.  There has some finishing work that had to be done on the ridge in the weeks that have followed but my DH took care of that work.  What made it more challenging than many projects we undertake on the restoration/renovation of our 1870 home is that we hired a contractor to do most of the work.  We had to work with his schedule, not ours.  One would think that would simplify things considerably, right?  It might, except that a flat section the old roof had to come off completely so that a new sloped roof could take its place - over my quilt studio! 

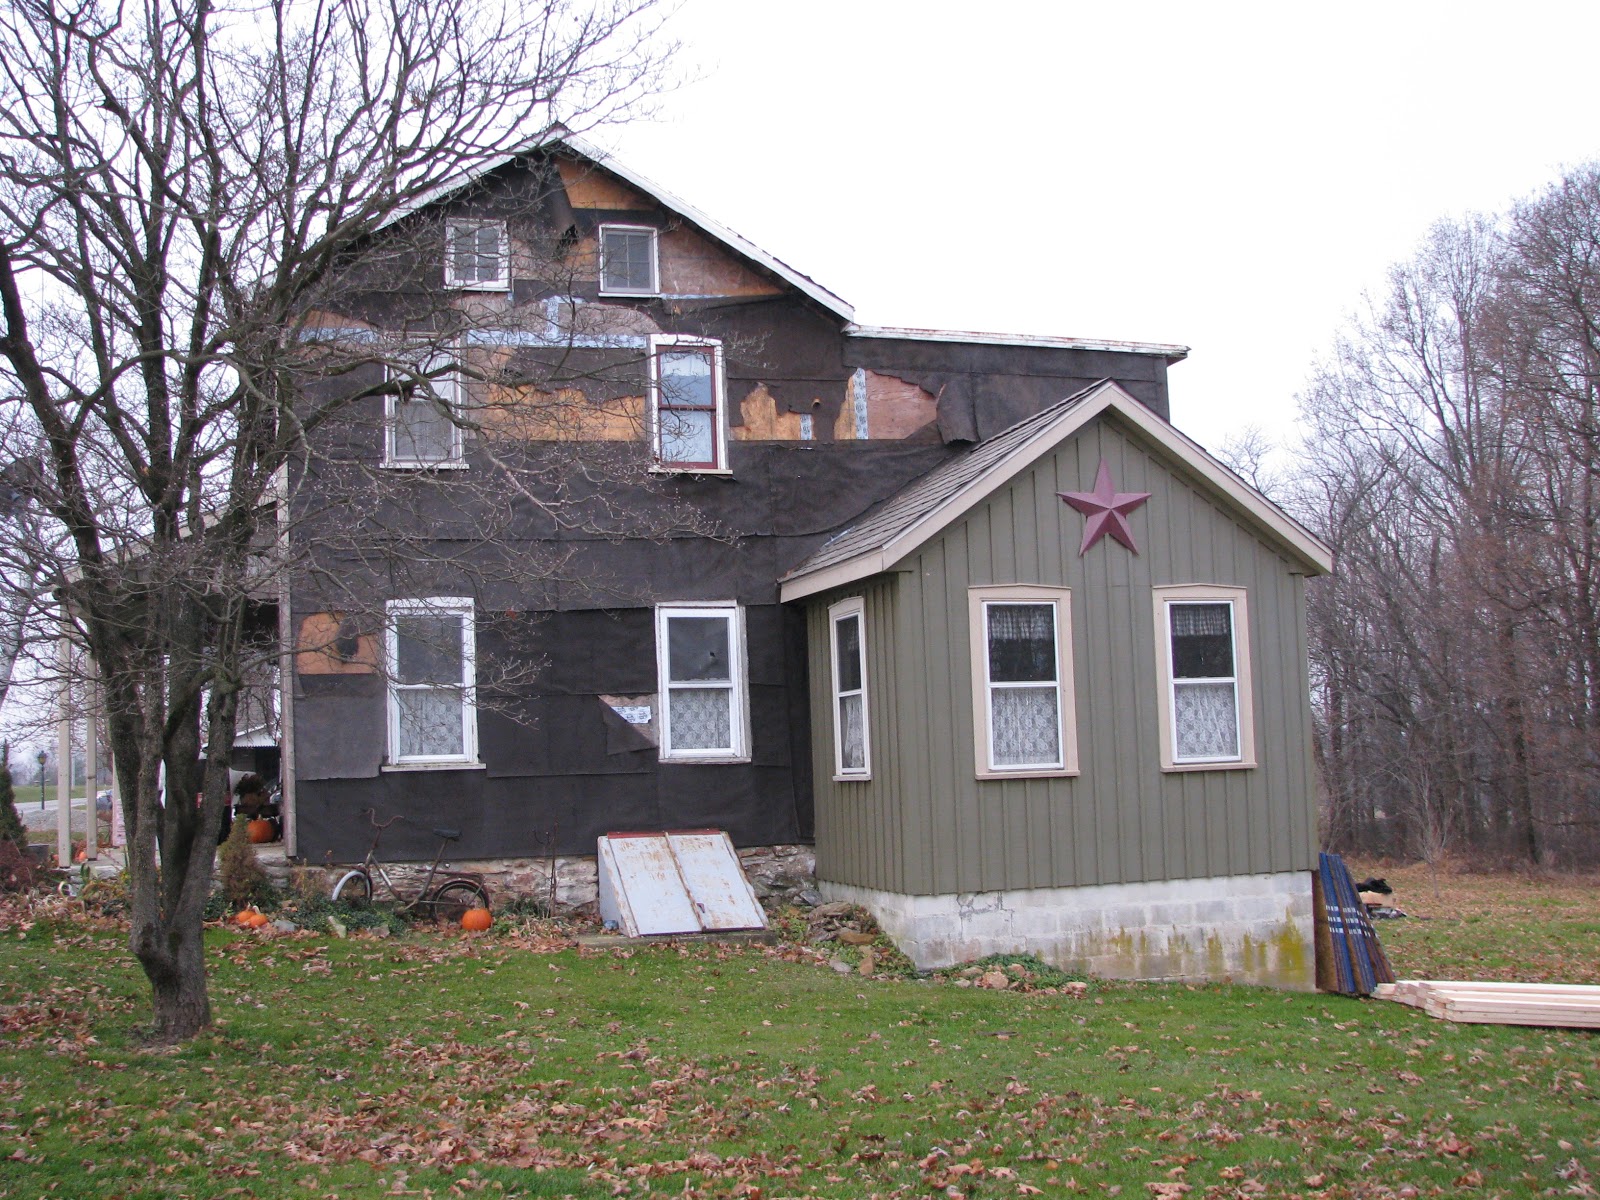
That room under the flat roof at the back of the house is my studio!

It's not flat anymore! The siding will go up in the spring.

A view from the front . . . re-shingling the front porch roof is another spring project.

The upside of all of this that has made the whole mess tolerable is that the wall I use for storage of fabrics, books, etc., gained 3 feet in height.  I will have 42 square feet more wall space for cabinets and shelves! 

My storage will go from these temporary shelves . . .

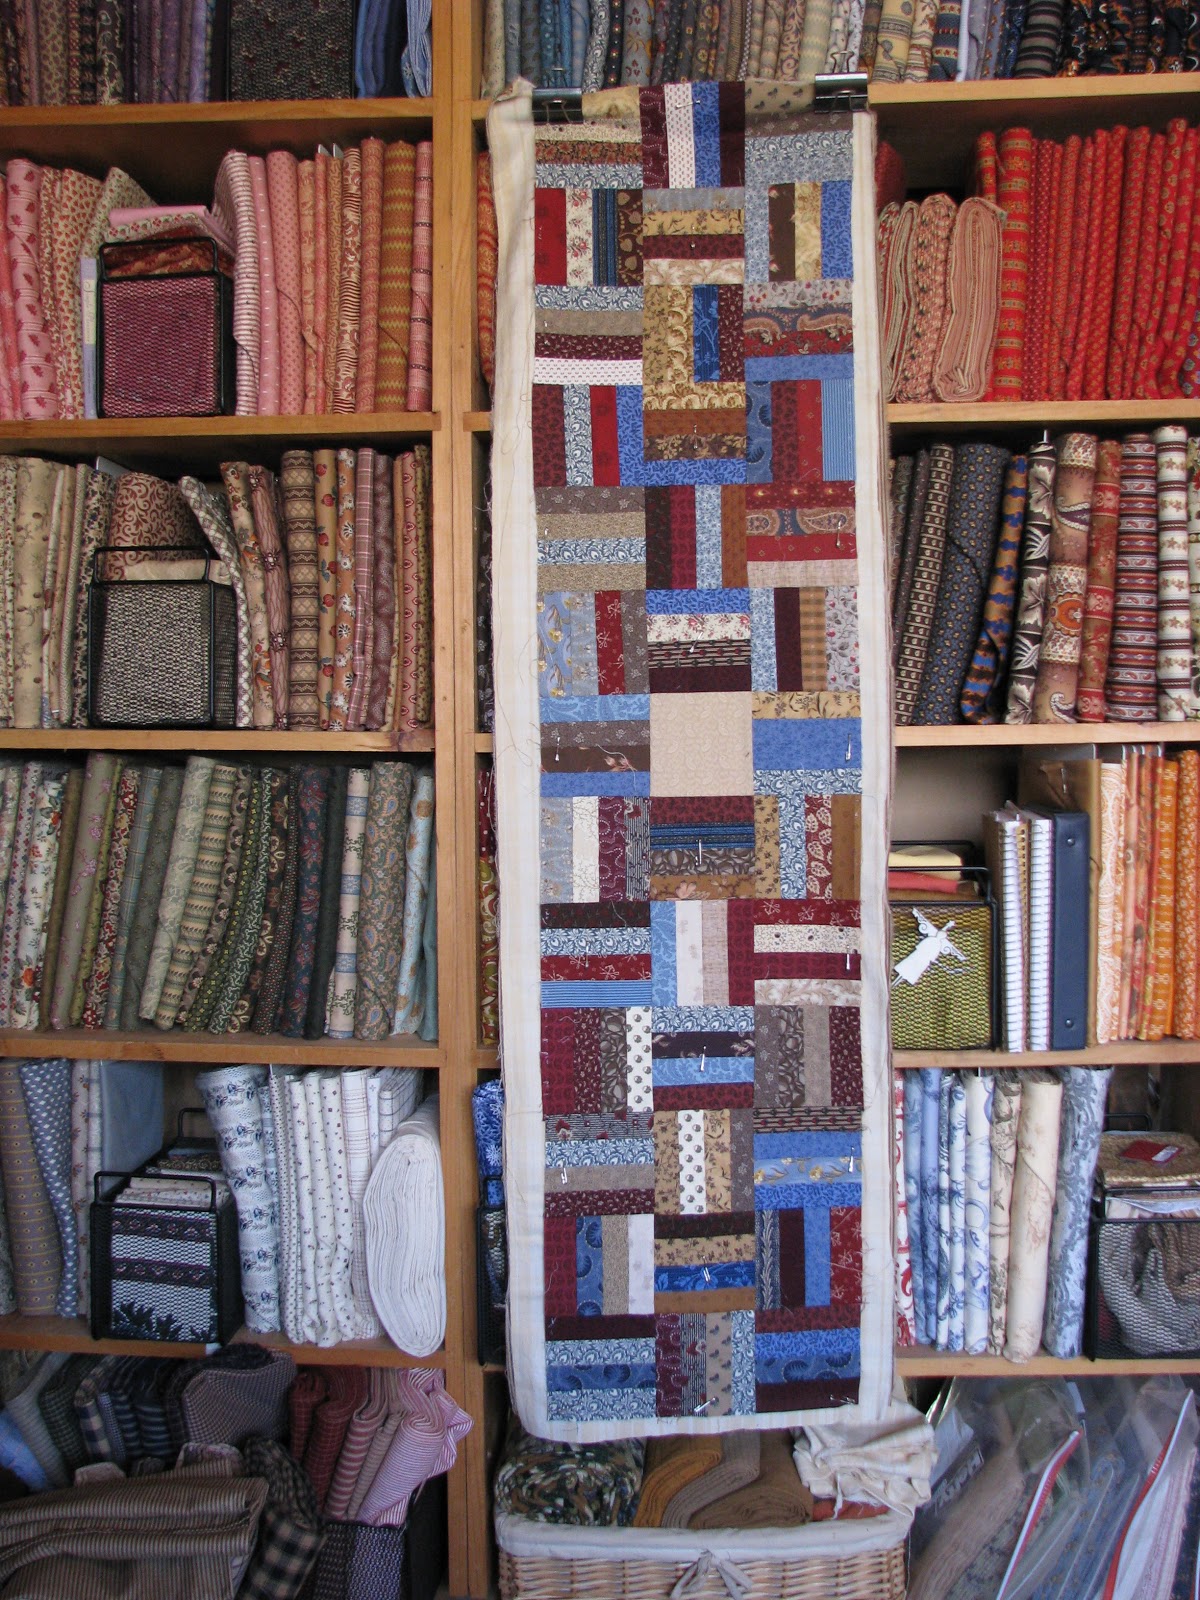
These shelves were 6' tall to fit under a 7' flat ceiling/roof.

To this . . . (for now you have to imagine the storage shelves). 

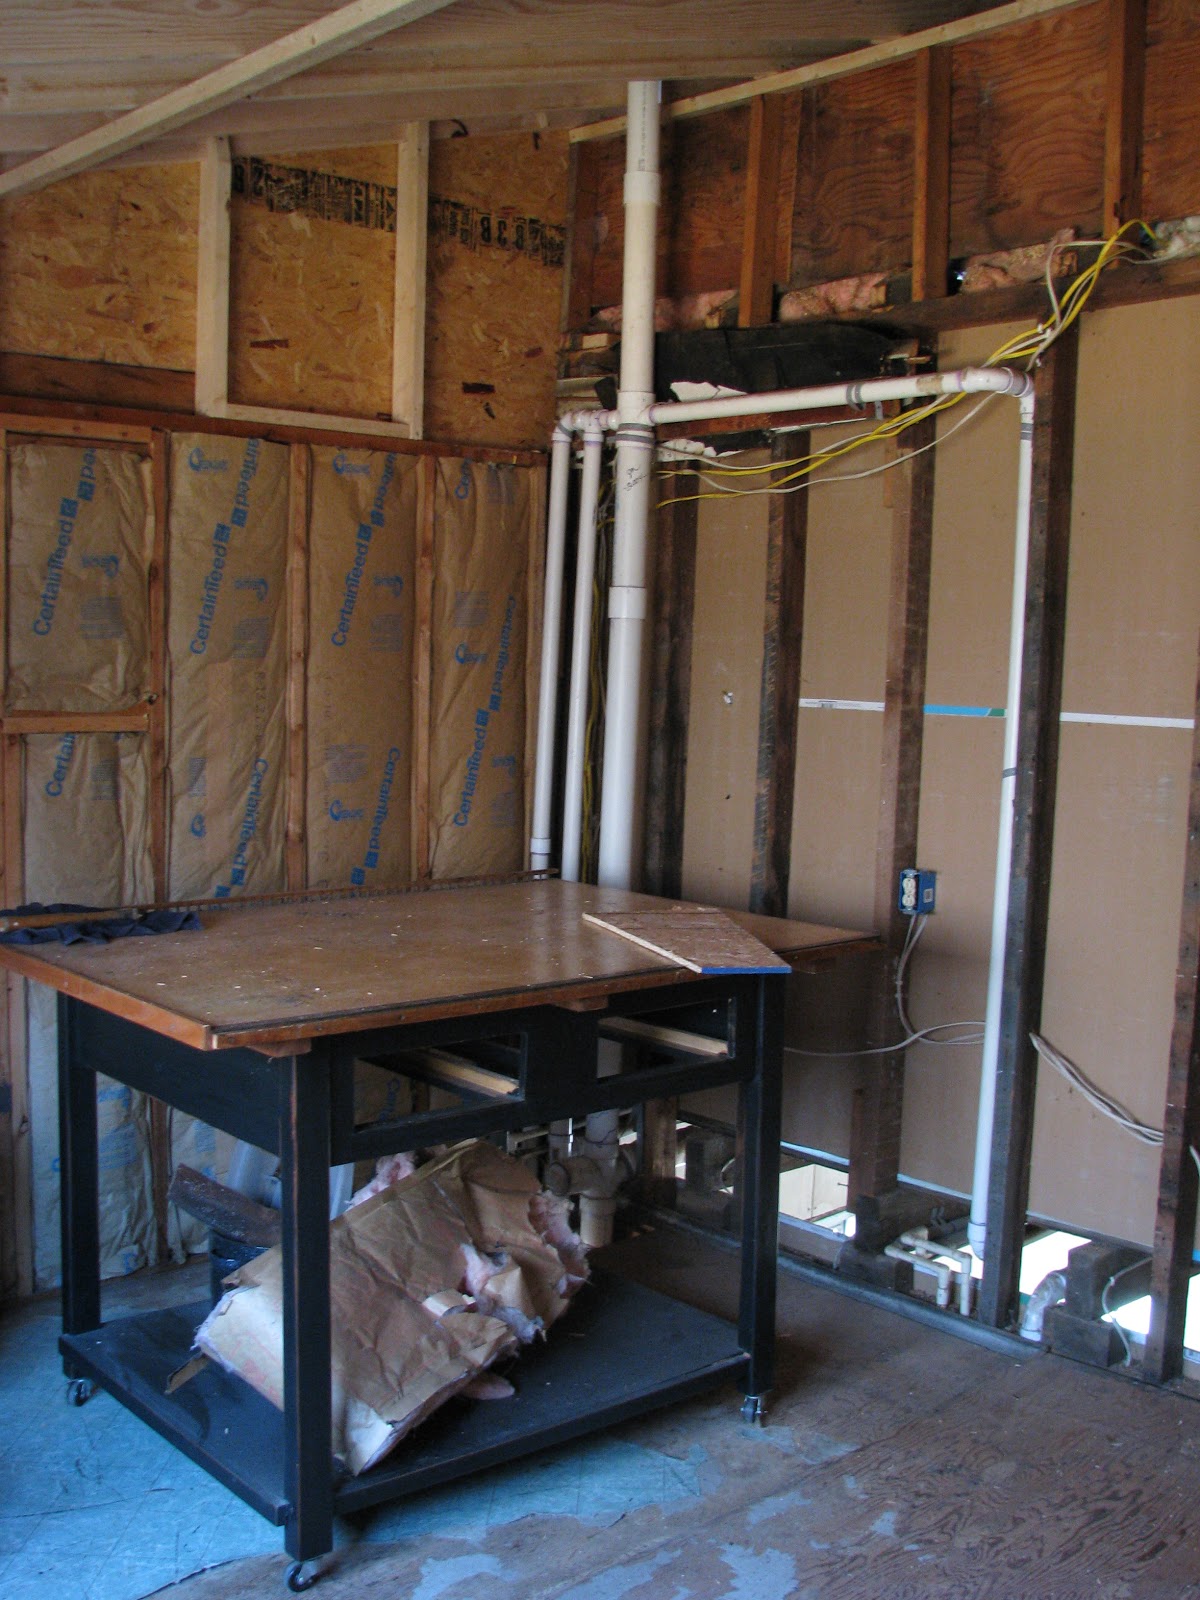
The horizontal white plumbing pipe used to be hidden in the old rafter space.    

In the world of renovation, one project creates multiple other projects.  The plumbing vent pipes had to be re-routed, wiring needed to be run, and the whole project needed to be insulated very quickly because the roof work happened on December 3rd and 4th.  For those two days the weather cooperated by giving us sun with 60-70 degree temperatures, but the very next day the weather changed back to temperatures more typical for December here.  Hopefully this weekend we will be able to start installing the drywall on the ceiling and walls.  After that the flooring goes down - boards we salvaged from downstairs which will match the rest of the floors upstairs.  Then starts the finishing work . . . and so on, and so forth . . . until I am finally able to move back into my studio.  Oh what a dream space it will be!


More about that later.


In the meantime, best wishes to everyone for a wonderful, prosperous, and quilt-filled New Year!

Greta


16 November, 2012

'The' AQSG 2012 Quilt Study

I can not believe how long I have been away.  Time sure flies when life gets busy.

One of the things I have been busy with is the American Quilt Study Group's 2012 Study of Early 20th Century Colonial Revival Quilts.  Twenty-eight wonderful study quilts were exhibited at the AQSG annual seminar which took place in Lincoln, Nebraska in early October 2012.  

The study quilts were inspired by at least one quilt made during the early 19th century.  Every single quilt is truly amazing! As a special treat this time five of the inspiration quilts were included plus poster size photos of inspiration quilts from the collection of the International Quilt Study Center & Museum. 


2012 Quilt Study Seminar Exhibit


Quilts from left to right are:
 'Double Nine Patch' by Pamela Weeks; 
'Drezden Daizies' by Me; 
and 'Flower Basket' by Catherine Noll Litwinow.


 Quilts from left to right are:
 'Pickled Geese' by Donna Starley; 
and  'Tulip Stars - Batik Makeover Edition' by Sandra Starley.
Yes, Sandra and Donna are sisters! 


 Quilts from left to right:
'Magic Vine' by Repiecers: A Southern California Quilt Study Group;
and 'Maria's Tree of Life' by Dale Drake.


Quilts from left to right:
'To Cleary With Love, From Ruth' by Jonda DeLozier;
'Summer Arbor' by Nancy Ostman;
'Great Grandma Laura's Scrap Baskets' by Terry Tickhill Terrell;
and 'The Wilkinson Sisters Revisited' by Marilyn Goldman.


 *****

Additional information about all 28 of the 2012 Colonial Revival quilts 
will be available on the AQSG website very soon!
AND
A book about this quilt study that will include patterns 
for a selection of them will be available soon at
The link will take you to the information page about the book published about the 
2010 Quilt Study: 'Stars: A Study of 19th Century Star Quilts'

If this type of project might be of interest to you please check out the Guidelines 

27 July, 2012

Good Intentions . . .

Life sometimes has a way of keeping us on our toes! 

I have had good intentions to post a blog note or two these last few weeks.  Much has been happening worthy of sharing here.  Unfortunately, time to sit at the computer has been very limited.  I have made good use of my time and have many things to share including a couple of recent additions to my antique quilt collection!  All of this will be coming soon, I promise.  G


Quilt of Valor

05 June, 2012

Making Progress

OK, so recovery progress has been a little slow . . .


I feel fine but the doctor's list of things I cannot do for another four weeks is long.  So, while I am not able to do all that I want to do, YET, I have been doing a little hand piecing.  I work most often with my sewing machines but it is always nice to have some handwork to do too. 


This LeMoyne Star project has been on my 'to do' list for years.  It is inspired by a variety of antique quilts that I have had the great pleasure to see from time to time. Even the quilting will be inspired by an antique zigzag quilt sold on an online auction many years ago; I missed adding the piece to my collection by just a few dollars. My consolation is the inspiration to make one of my own.


As you can see I love to use baskets in my studio. Sitting on my cutting table I have a small sewing basket for handwork at home, another basket for my pressing supplies, and even a basket for each PIP (Project in Progress). Since this project is a take-along I also have a handy clear plastic tote that I can throw into my bag on the way out the door. It never ceases to amaze me how much can be done in the few minutes here and there waiting for appointments and such.

How do you keep your PIP's together?

As of today I have 13 blocks finished.

I will need forty-nine 7-inch scrappy star blocks that are pieced with a wide variety of fabrics from my stash.  The block backgrounds are all solid off white.  I am doing my best NOT to purchase any fabrics for this project. With one exception. The setting triangles and border will be made from the large floral print called Chestnut & Vine by Faye Burgos for Marcus Fabrics purchased at a local fabric stop several weeks ago. That purchase helped inspire me to get this project started. 

I have the diamonds marked for another 7 stars so it is time to get back to work . . .

Gelukkig quilt te maken!

23 May, 2012

Getting Back to Normal . . .

I am so happy to be getting back to normal after these last several weeks.  It is amazing how much time and energy goes into preparing for, having, and recovering from surgery.  Technically I am still in the recovery period but feeling much better and ready to return to doing some light duty tasks - like quilting and blogging. 

Since my level of productivity has been down as of late, I thought I would share a project from several years ago that other quilters on the go might be interested in.

Quilting 'Tumbling Blocks' Patchwork Print
on an early 20th century New American treadle sewing machine

I used one of my antique treadles, named Rosie, to quilt a reproduction patchwork print for use in making a bag to carry quilts to guild meetings, quilt studies, and anywhere else a quilt or quilts need to travel with me. 

Big (approximately 18" x 18") 
As you can see the bag accommodates one quilt or many because it grows.

Bigger (approximately 18" x 26") 
And grows!
Biggest (approximately 18" x 38") 

I have carried as many as 3-4 full size quilts with the bag fully expanded.

If you are interested in making one of these you will need:

     1-1/2 yards fabric for bag exterior
     1-1/2 yards fabric for bag interior
     batting (approximately 45" x 60")
     8 yards 1-1/4" cotton webbing for handles
          (2 pieces 108" and 6 pieces 9")
     complimentary fabric for approximately
          60" straight grain binding

Layer the exterior fabric as you would a quilt top with the interior (backing) fabric and batting to create a quilt sandwich.  Quilt as desired. 

Square one corner of the quilted piece to a 90 degree angle.  Measuring from the squared corner cut a 40" x 40" piece from the quilt sandwich.  From the remaining strip cut 2 pockets 9" x 18".  I had enough left over to make a small pouch to carry other items too!

Bind the top 9" edge of both pocket pieces before beginning assembly.

Lay the 40" piece flat and mark a fold line at 20".  The fold will be one long side of the finished bag.  Place the pocket pieces on either side of the fold line so that the pockets will be centered on each side of the finished bag and pin or tack into place. Be sure to allow for the french seam that will become the side of the bag opposite the fold.  From a 40" width the bag finishes to approximately 18-19 inches depending upon the width of the finished side seam. (I used cotton fabric with thin cotton batting.  Thicker materials would result in a bulkier seam.)

With the bag still laid out flat place one set of 9" handles on each side parallel to the top and above the pockets at 20" from the bottom of the bag.  Place a second set of 9" handles at 28" from the bottom of the bag.  Place a third set of  9" handles (optional) approximately 1" below the top of the bag.

Now lay out the webbing for each of the long handles to cover the unfinished edges of the pockets and the ends of the 9" handles. Adjust the loop at the top to suit the height of the intended user before pinning the second side.  (I am 6' tall so my shoulder handles are quite long.  These could be shortened with the top set of 9" handles eliminated if so desired.)  Top stitch the long handles into place on both sides of the webbing making sure the edges of the pockets and 9" handles are secured by back stitching in those areas.

Fold the bag on the fold line with the insides together.  Sew a seam (approximately 3/4") down the long side of the bag opposite the fold.  Turn the bag inside out and sew down the long side of the bag again so that the unfinished edges are captured inside the seam forming a french seam.  Repeat the process for the bottom seam.  Both could be sewn with one turning but I prefer the nicer finish offered by turning the bag twice. 

Turn the bag right side out and sew the binding to the top edge.  Fill with quilts and go!

When the larger size is not needed simply fold the top into the bottom of the bag before filling and carry with the appropriate set of handles. 

Since I didn't take photos while making this bag I don't have any to share here, however, construction is pretty simple.  If you have any questions please feel free to email me.  Now when I am asked for instructions for this bag, which happens almost every time I carry it, I will finally have a place to direct people to.  ;-)

Deze roos was het eerste wat ik zag toen ik wakker werd
 in mijn kamer na de operatie.
 Bedankt, Honey!

25 April, 2012

Sow-A-Long Blocks 16, 17 &18 . . .

I started this project as a challenge to myself because I seldom, actually never, do well following others especially when it comes to making quilts. Kudos to Randy at BarristersBlock.blogspot.com for making this project interesting!  She offers just enough blocks for me to remain challenged to keep up without keeping me from working on other PIPs.

Vocabulary: 'PIP' means 'Projects in Progress' which I prefer over the alien reference more commonly used. :-)

I was otherwise occupied when Randy posted the 'Milky Way' block as a bonus on April 12th, but here it is:


I finished that one plus the three posted on the Third Wednesday of April last week when I had a little sewing time in between other commitments. 

Sow, what do you think of my version of blocks 16, 17 & 18?

Clockwise from left are Dutchman's Puzzle,
Hooker's Hat Patch*, and Sawtooth Star
(*from Carol Hopkins' 'Civil War Legacies')

Of course, I could not leave out the bonus block posted on April 18th . . .


Since the beginning of February Randy has posted 18 official blocks on the first and third Wednesdays of each month.  Add to that the 6 bonus blocks offered and I have been able to complete the third column of my quilt top.


I create the partial blocks as fillers from either duplicate blocks included in the challenge or elements from the blocks made up into half-blocks to complete what will be the even numbered columns.  

I have just read her blog post for today (April 25) and learned there is an additional bonus block for me to sew which will give me 3 of the 8 blocks I need for my 4th column.  Yippee!

Gelukkig zaaien!


11 April, 2012

AQSG Quilt Study - 2010

 This was my entry for the AQSG Quilt Study in 2010. 

'Homespun Star'
36" x 36"
2010
Participants are asked to write a brief statement about our study projects that includes the following information:

1) Why you selected your inspiration quilt.  Was there something about that quilt in particular or the style that caught your interest?   

2) What approach you took in constructing your quilt.  Did you opt to replicate the original or did you find inspiration from the original to create your own?   How involved was your design process? 

3) What you learned from the process of making your study quilt.  What similarities or differences are there between you and your quilt and the maker of the original?  Did you get any sense of connection with the maker of the original quilt?  How did your experience differ from what you anticipated, or did it?  Why? 


My statement for Homespun Star reads:

Initially, I planned to use a quilt in my own collection as inspiration for the Quilt Study until this long-time favorite jumped off the page of my well-loved copy of Treasury of American Quilts, by Cyril I. Nelson and Carter Houck. As Co-chair of the AQSG Quilt Study project I reasoned that changing my original plan would give me an opportunity to do what other participants were being asked to do: seek permission to use images of the inspiration pieces used for the Quilt Study.
My only disappointment in the process came when I learned from the Museum of American Folk Art, the current owner of the ‘Center Star Quilt’, that there is very little provenance available for this amazing bedcover. After reviewing what is known, it became obvious the information had evolved as quilt historians learned more about identification of fibers used in early whole cloth quilts. For example, the fabrics in this quilt are identified as linsey-woolsey in one publication and wool in another. The confusion about early fabrics gave me just the inspiration I needed; I decided to investigate the process of how ‘home’ spun and woven fibers used in early quilts would have been produced.
My journey started with the purchase of a 19th century spinning wheel. I had never spun any type of fiber before. I found the process VERY challenging in the beginning, initially believing I would never be able to produce a yarn consistently fine enough to actually create fabric. However, with a pound of perseverance I succeeded in spinning enough wool to weave all of the fabrics in my quilt. The front is 100% wool from sheep raised near my home in Lancaster County, Pennsylvania. For contrast I opted to create ‘linsey-woolsey’ by weaving a wool weft through a purchased linen warp for the back of the quilt.
As a result of making ‘Homespun Star’ I have a genuine appreciation for the industrial revolution that helped relieve women of the responsibility to create the fabrics needed by their families and in their homes. Notwithstanding the hours required to create a few inches of genuine homespun fabric, I am inspired to spin all of the wools and linens to make a whole cloth bed quilt the old fashioned way.
The spinning wheel and rigid heddle loom
I used to make Homespun Star

If you are interested in seeing and reading about all 39 quilts that participated in the 2010 Quilt Study, click on the words "AQSG’s 2010 Quilt Study of Star Quilts".  Twenty-five of the quilts are included in a travelling exhibit that is being exhibited at museums and quilt shows throughout the United States.  The travel schedule is being extended into 2013 and possibly into 2014, so check for updates at http://www.americanquiltstudygroup.org/QS%20Exhibit%20Schedule.asp.

We are in the final stretch of the 2012 Study of Colonial Revival Quilts of the Early 20th Century, but there is still time to participate and space available.  You can review the guidelines at http://americanquiltstudygroup.org/Quilt%20Study.asp.  If you are interested in joining us please feel free to contact the AQSG Quilt Study Committee at AQSGQuiltStudy@yahoo.com or email me directly. 

P.S. - I owe a debt of thanks to my good friend Betty Clarkson, proprietor of Little Pine Traditional Crafts in Lancaster, PA for helping me learn the skills necessary to complete this project.  The shop carries everything a new or experienced spinner, weaver, and dyer of wool could ever need; and Betty's expertise and kindness is unsurpassed!

10 April, 2012

Sow-A-Long Blocks 13, 14 & 15

Life has been busy here.  Yet in between all the fun I have managed to keep up with the Sow-A-Long project organized by Randy at Barrister's Block.  She occasionally speeds this project along by posting extra blocks, as was the case the last week of March. 

March 29, 2012 - Papa's Birds


March 30, 2012 - Scrappy Star


With my limited color palate my it seems my Scrappy Star is not so scrappy, but I like it just the same. 

I only needed one of these two extra blocks, plus two half blocks to finish the second row of my quilt top. 


Last week three 'regular' blocks were posted on the first Wednesday in April.  I had  all of my blocks up-to-date by Thursday, but it has taken me this long to post them. . .

Cups & Saucers, Steps to the Alter
and Friendship Star

The next row requires a total of 7 complete blocks with another two half blocks.  The center of this top will be either a total of 7 or 9 rows.  I have a few ideas already for the borders, but we will have to wait to see what the quilt decides.
Vrolijke lente!


06 April, 2012

AQSG Quilt Study - 2008

The quilt below was my inspiration for the American Quilt Study Group's 2008 Study of Mid 19th Century Red & Green Quilts.

The original quilt is owned by a generous neighbor who allowed me to use their quilt as inspiration for my project.  The shades of tan were once green and the center includes machine quilting.


The quilt was made by a women who may have been a former slave.  Verbal family history indicates the quilt was made sometime after the quilt maker obtained her freedom.  Research is ongoing.

I was fascinated to find machine quilting in the red shapes at the center of each block, but the remainder of the quilting is by hand. The construction of the quilt is a combination of hand and machine. The solid red has held up reasonably well, however, the greens have faded to shades of brown and tan and it is obvious more than one fabric was used.

I deviated from the original solid colors and used earlier 19th century prints for a subtle visual interest. I did all of the applique by hand and used a treadle sewing machine for assembly of the top and all of the quilting.


My 2008 Study Quilt
Study Quilt Label


You can see this quilt and 18 other quilts inspired by 19th Century Red & Green Quilts that were all part of the AQSG 2008 Quilt Study at:
http://www.allpeoplequilt.com/magazines/americanpatchworkquilting/red-green-quilts_ss1.html

I will share my 2010 study quilt in a future post.

If this type of quilt study is interesting to you, please check out more about this great project at the AQSG website:  http://www.americanquiltstudygroup.org/Quilt%20Study.asp

You can also ask me.  I am the current Quilt Study Committee Chairperson!

05 April, 2012

More Siggies . . .

Here are a few more Siggy blocks I have received . . .


Thank you, Arianne!


Thank you, Mary!
Thank you, Annette!

Swapping these little Siggy blocks with new friends around the world is a great deal of fun!

02 April, 2012

Siggy Blocks . . .

My collection of Siggy blocks is growing. 
Check out some of the recent additions . . .

Thank you, Jeanneke!
Thank you, Chris!
Thank you, Riekie!
Thank you, Linda!

Thank you, Marjo!

If you would like more information about this fun block swap
check out Annelies' blog 'Quilts and Siggies'.
Thank you to Annelies for organizing this project.

22 March, 2012

Sow-A-Long Blocks 10, 11 & 12

Here they are!


My next three blocks for the

Last week Randy offered the following
 two blocks for some additional fun.

You may notice these blocks have a little something extra folded behind them.

That is because I decided to put my blocks into a zigzag setting, which is one of my favorites.
There was little reason to wait.  :-)

Here is what I have so far . . .


Can you make out the beginning of the zigzag?

I opted to use three shades of blue that read as solids.  They compliment the prints I used for my blocks.  They will make a nicely blended scrappy zigzag between the blocks set on point. 

I anticipate a total of 9 columns with 8 complete blocks in the odd numbered columns. 
The four even numbered columns will have half a block at the top and bottom.
My planned layout should allow for a nice 'playground' that I plan to fill with wonderful quilting.

You can also see in this photo a bit of the construction going on in my studio.  
Even with this room incomplete I enjoy spending time in here as often as possible.
It is already my favorite room in the house.  When it is complete I may never leave . . . LOL!

Gelukkig naaiwerk!

19 March, 2012

Treadle Machine Quilting

Have you ever sewn, or machine quilted with a treadle sewing machine?

Machine Quilting on a Treadle

The quilt being quilted in the photo is one I made for the
2008 American Quilt Study Group's Study of 19th Century Red & Green Quilts.
Nineteen (19) of the quilts that were included in the Study can be viewed at HERE.


I learned to sew as a very young girl;
first by hand and later by machine on my mother's
Singer Featherweight. 
 I still use the Featherweight for some projects.
In 1998 my DH purchased a Bernina 150 QE for me for our 20th wedding anniversary. 
These days I use my Bernina for most 
piecing and machine quilting.
I have tried newer models but I much prefer the one I have;
we are attached at the hip and work well together.

I am fascinated by sewing machines,
especially the early models.

Quilting Tumbling Blocks Patchwork Print (aka, cheater cloth)

How these mechanical wonders were used to make quilts is an ongoing research project of mine.
To better understand the machines themselves and how they could be used to help 19th century quiltmakers I started a collection of early treadle sewing machines.
I use them to see what features 'modern' 19th century quiltmakers had available.

While I love using all of the machines I have available to me for making quilts, I also love the piece and quilt by hand.  However, in the interest of getting more done most of my quilts are brought into being by machine.

What sewing machines, if any, do you use to make some of your quilts?
 
I think I have finally been able to remove the word verification feature from comments, so please feel free to leave a comment if you wish.

Heb een geweldige dag!

13 March, 2012

Winding Ways . . .

One of the downsides to restoring/renovating a 19th century house is that so many things have to remain in storage.  So how does one enjoy treasured objects that are safely stored away?

Winding Ways Quilt
Early 20th Century

Photographs of course!
I keep information about each of the quilts I make and antique quilts in my collection in a scrapbook.  Documenting them I hope will help future generations know more about these treasures that mean so much to me.

TGIS!
(Dank goodnes de lente!)